Tuning a fresh Proxmox install with ProxMenux: a homelab walkthrough
I installed ProxMenux on my AMD Ryzen 7 5800H mini-PC running Proxmox VE 9.1.1 and walked through every numbered option, picking only the ones that actually matter for a single-node homelab. Here's exactly what I ran, what I skipped, and why.
After standing up a fresh Proxmox VE 9.1.1 install on my mini-PC, I had two annoyances staring at me from the web UI: a yellow warning that the Enterprise repository needed a valid subscription, and the “no valid subscription” popup that greets you on every login. Plus the usual question every Proxmox user faces on day one — what should I tweak before I start running VMs and containers on this thing?
I’d seen ProxMenux (by MacRimi) recommended in a few homelab forums. It’s a menu-driven post-install script that wraps a curated set of Proxmox tweaks behind a friendly TUI, organized into numbered options. Perfect — except that it has a lot of options, and most write-ups about it just dump the full list at you without any opinion on what to actually run. I wanted a shorter list: only the things that genuinely help a single-node homelab on AMD hardware, skipping anything cluster-related, anything purely cosmetic, and anything with no real impact.
This post is that shorter list, with the reasoning behind each pick.
TL;DR — On a single-node homelab running PVE 9.1.1, I ran options 1, 2, 3, 4, 7, 8, 10, 13, 14, 17, 20, 23, 28, 31 from the ProxMenux Customizable Post-Install Script. I skipped options 5, 6, 9, 11, 12, 15, 16, 18, 19, 21, 22, 24, 25, 26, 27, 29, 30, 32, 33. The single most important one was option 4 (Update and upgrade system) — it switches your repos from Enterprise to no-subscription and resolves the apt-get errors most people see on a fresh install.
The hardware I was tuning
Before I get into the menu, here’s the box I was working with. This matters — a few of ProxMenux’s options are written for enterprise setups (Ceph, HA clustering) or for hardware I don’t have (Intel iGPUs, low-RAM systems), so the right answer for “should I run this?” depends heavily on what you’ve got.
| Spec | Value |
|---|---|
| Hostname | pm1 |
| Proxmox VE version | 9.1.1 (pve-manager/9.1.1/42db4a6cf33dac83) |
| Kernel | Linux 6.17.2-1-pve (2025-10-21) |
| Boot mode | EFI |
| CPU | AMD Ryzen 7 5800H with Radeon Graphics (16 threads, 1 socket) |
| RAM | 59.77 GiB |
| Storage | ~1.76 TiB total |
| Repository status | Enterprise enabled, no valid subscription |
That’s a Cezanne-class APU (Zen 3), 64 GB of RAM, and a couple TB of local storage — a fairly typical “mini-PC homelab” loadout. Headless, on 24/7, single node, no cluster ambitions.
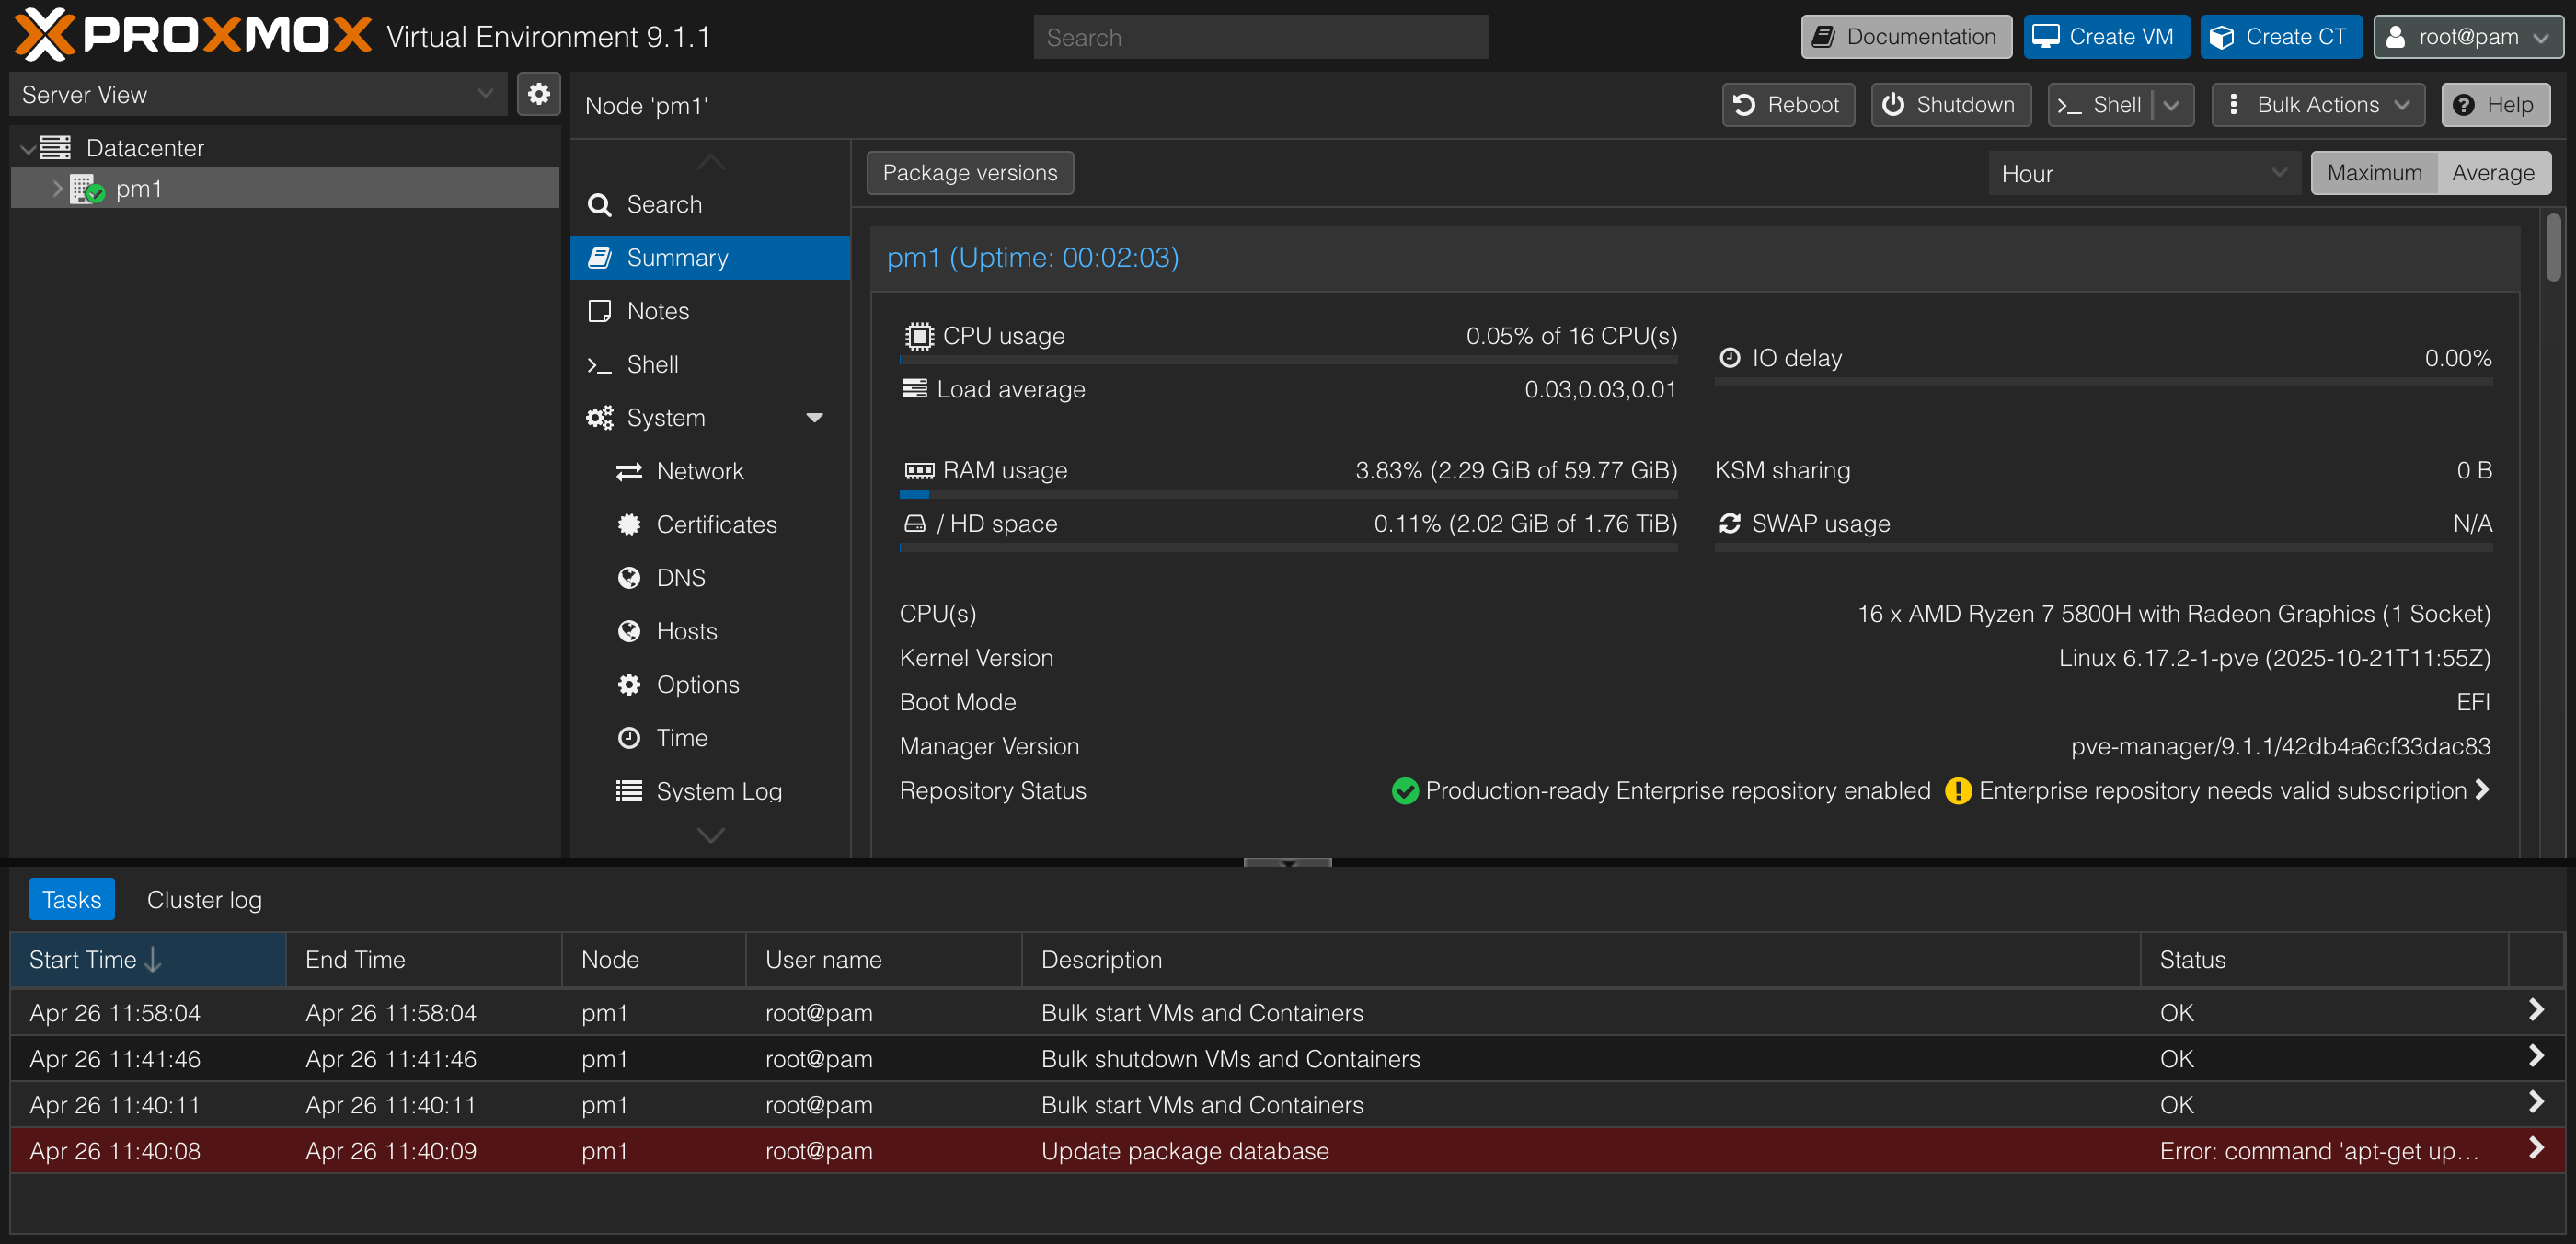 The starting state — note the yellow “Enterprise repository needs valid subscription” warning on the right.
The yellow warning at the bottom right of that screenshot is exactly what we’re going to fix first.
Installing ProxMenux
Installation is a single command, run as root from the Proxmox shell:
1
bash -c "$(wget -qLO - https://raw.githubusercontent.com/MacRimi/ProxMenux/main/install_proxmenux.sh)"
After it finishes, you launch the menu by typing:
1
menu
You’ll get a top-level menu. The one we care about is Post-Install Settings for Proxmox → Customizable Post-Install Script, which is where the numbered options live.
ProxMenux is community software — it’s not endorsed by Proxmox themselves, and the install method is the classic
wget | bashpattern. If you’re paranoid (and you should be a little paranoid), download the script first, read it, then run it. The project is GPL-3.0 and actively maintained, but caveat installator.
How I decided what to run and what to skip
Before clicking anything, I had Claude do a deep-dive on ProxMenux’s docs and changelog and tell me which options were actually worth running for my specific situation. The rules I gave were straightforward:
- Skip cluster and enterprise stuff — I have one node, so anything that exists for Ceph, HA, or multi-node clustering is just dead weight.
- Skip cosmetic changes — I don’t need a custom MOTD or an ASCII-art banner.
- Skip things with no measurable impact — if a tweak only matters in some narrow edge case I don’t have, skip it.
- Include things with trade-offs — but be explicit about what the trade-off is.
What follows is the result, walked through in the order ProxMenux numbers them.
The Customizable Post-Install Script: what I selected
When you open the script, you get a checkbox-style multi-select menu. You space-bar to toggle each option, then hit Enter to run all the selected ones in sequence. Here’s the first page of the menu:
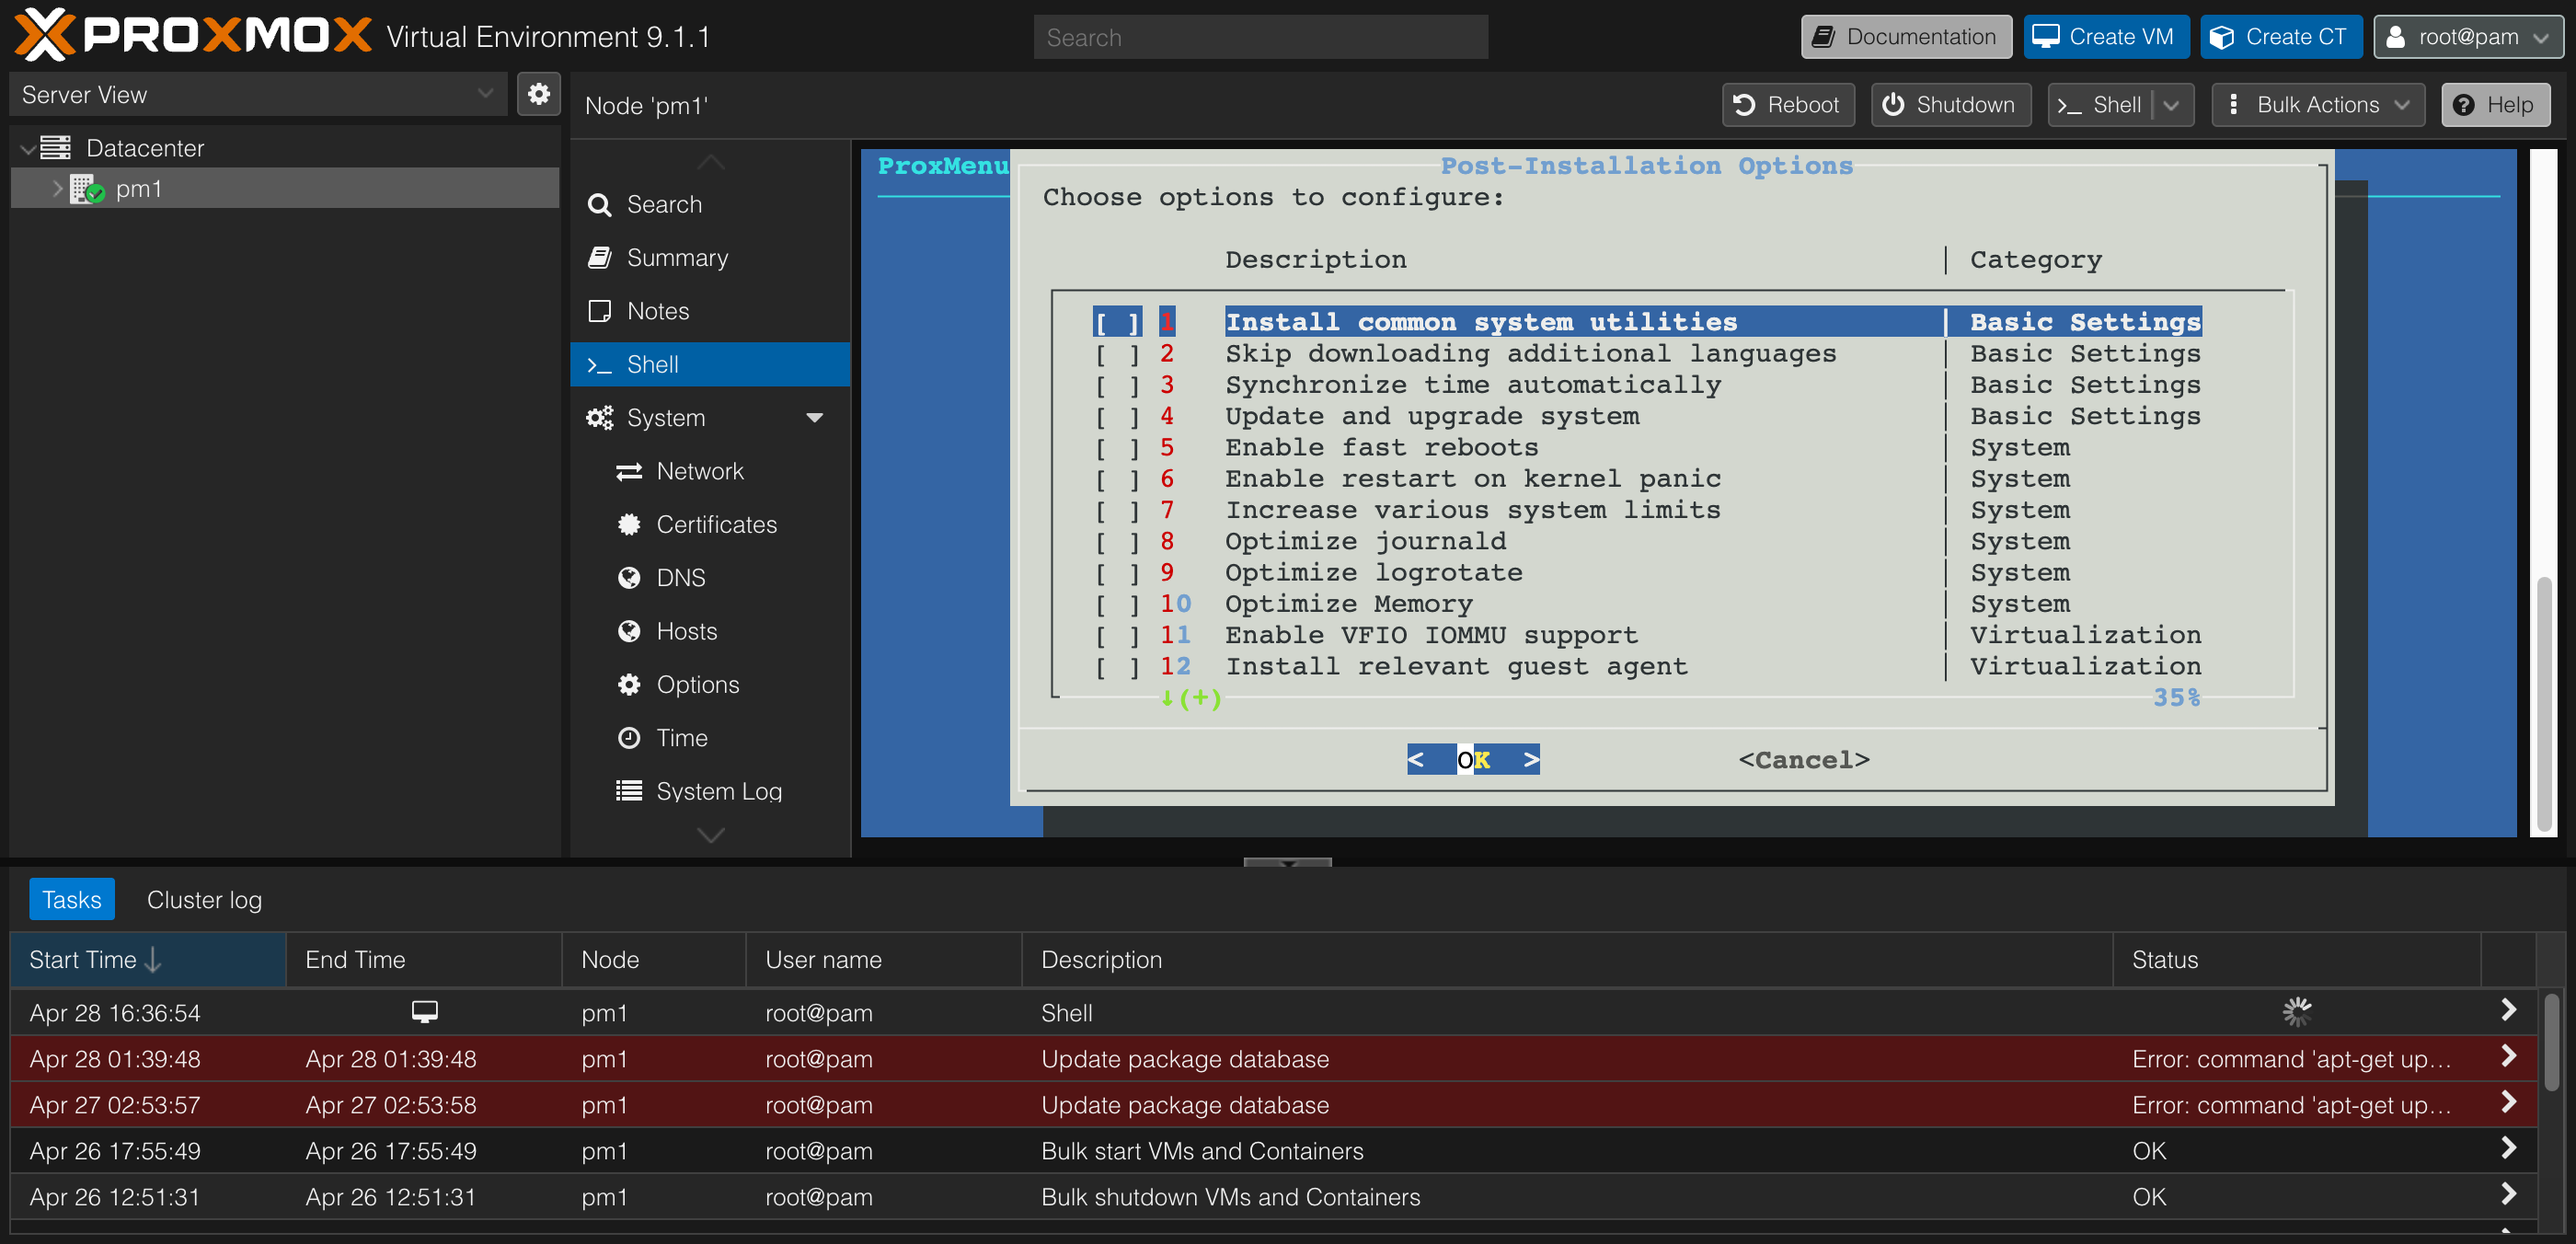 Options 1–12: Basic Settings, System, Virtualization.
Basic Settings (1–4): all four, no exceptions
These four options were the easiest call of the entire run:
- 1. Install common system utilities — multi-select sub-menu of CLI tools (more on this below). Useful, low-risk.
- 2. Skip downloading additional languages — adds
Acquire::Languages "none";to APT config. Faster updates, smaller downloads. The trade-off is that you lose translated package descriptions, which I never read anyway. - 3. Synchronize time automatically — sets timezone (optionally via IP geolocation) and configures
chrony. The geolocation lookup hitsipapi.co, which is a minor privacy footnote but nothing dramatic. - 4. Update and upgrade system — this is the one that matters most. It comments out
pve-enterprise.listandceph.list, adds thepve-no-subscriptionrepo, configures Debian’s main/contrib/non-free/non-free-firmware/security sources, and runsapt dist-upgrade. This is the option that resolves the “Enterprise repository needs valid subscription” warning and the failingapt-get updateerrors visible in the task log on a fresh install.
If you only run one option, run option 4.
System (5–10): only the tuning, none of the boot-risky stuff
This category is mixed — some genuinely useful tuning, some options with surprising downsides.
- 5. Enable fast reboots — skipped. Marginal benefit on a server that reboots maybe once a month after a kernel update.
- 6. Enable restart on kernel panic — skipped. Sounds nice, but on a homelab where I have direct console access, an automatic reboot loop on a persistent failure is worse than just letting the machine sit there and tell me what went wrong.
- 7. Increase various system limits — selected. Bumps
inotify, file descriptor limits (nofile), and similar. Stops “too many open files” errors when you have a bunch of containers and VMs running simultaneously. - 8. Optimize journald — selected. Caps journal size so logs don’t slowly eat your root partition. Especially important on SSDs/NVMe, where unbounded journal growth is a real wear concern.
- 9. Optimize logrotate — skipped. Minor improvement that overlaps with what option 8 already does.
- 10. Optimize Memory — selected. Tunes
vm.swappinessand similar memory-management knobs. Sensible defaults for a system with 60 GiB of RAM.
Virtualization (11–12): conditional and a misleading one
- 11. Enable VFIO IOMMU support — skipped, but only because I’m not doing PCIe passthrough yet. If you plan to pass through a GPU, NIC, or other PCIe device to a VM, you want this. For my AMD CPU it adds
amd_iommu=onand the four VFIO modules. Caveat for EFI installs: ProxMenux writes to/etc/default/grub, but PVE 9 EFI installs commonly use systemd-boot viaproxmox-boot-tool, in which case GRUB edits are silently inert. After running, verify withcat /proc/cmdlinethatamd_iommu=onactually shows up; if not, you’ll need to add it to/etc/kernel/cmdlineand runproxmox-boot-tool refreshmanually. - 12. Install relevant guest agent — skipped. This one’s misleading. It installs
qemu-guest-agenton the Proxmox host itself, which only matters if Proxmox is running nested inside another hypervisor. The guest agent belongs inside your VMs, not on the host. I’m bare-metal, so this option does nothing useful for me.
Network (13–17): three out of five
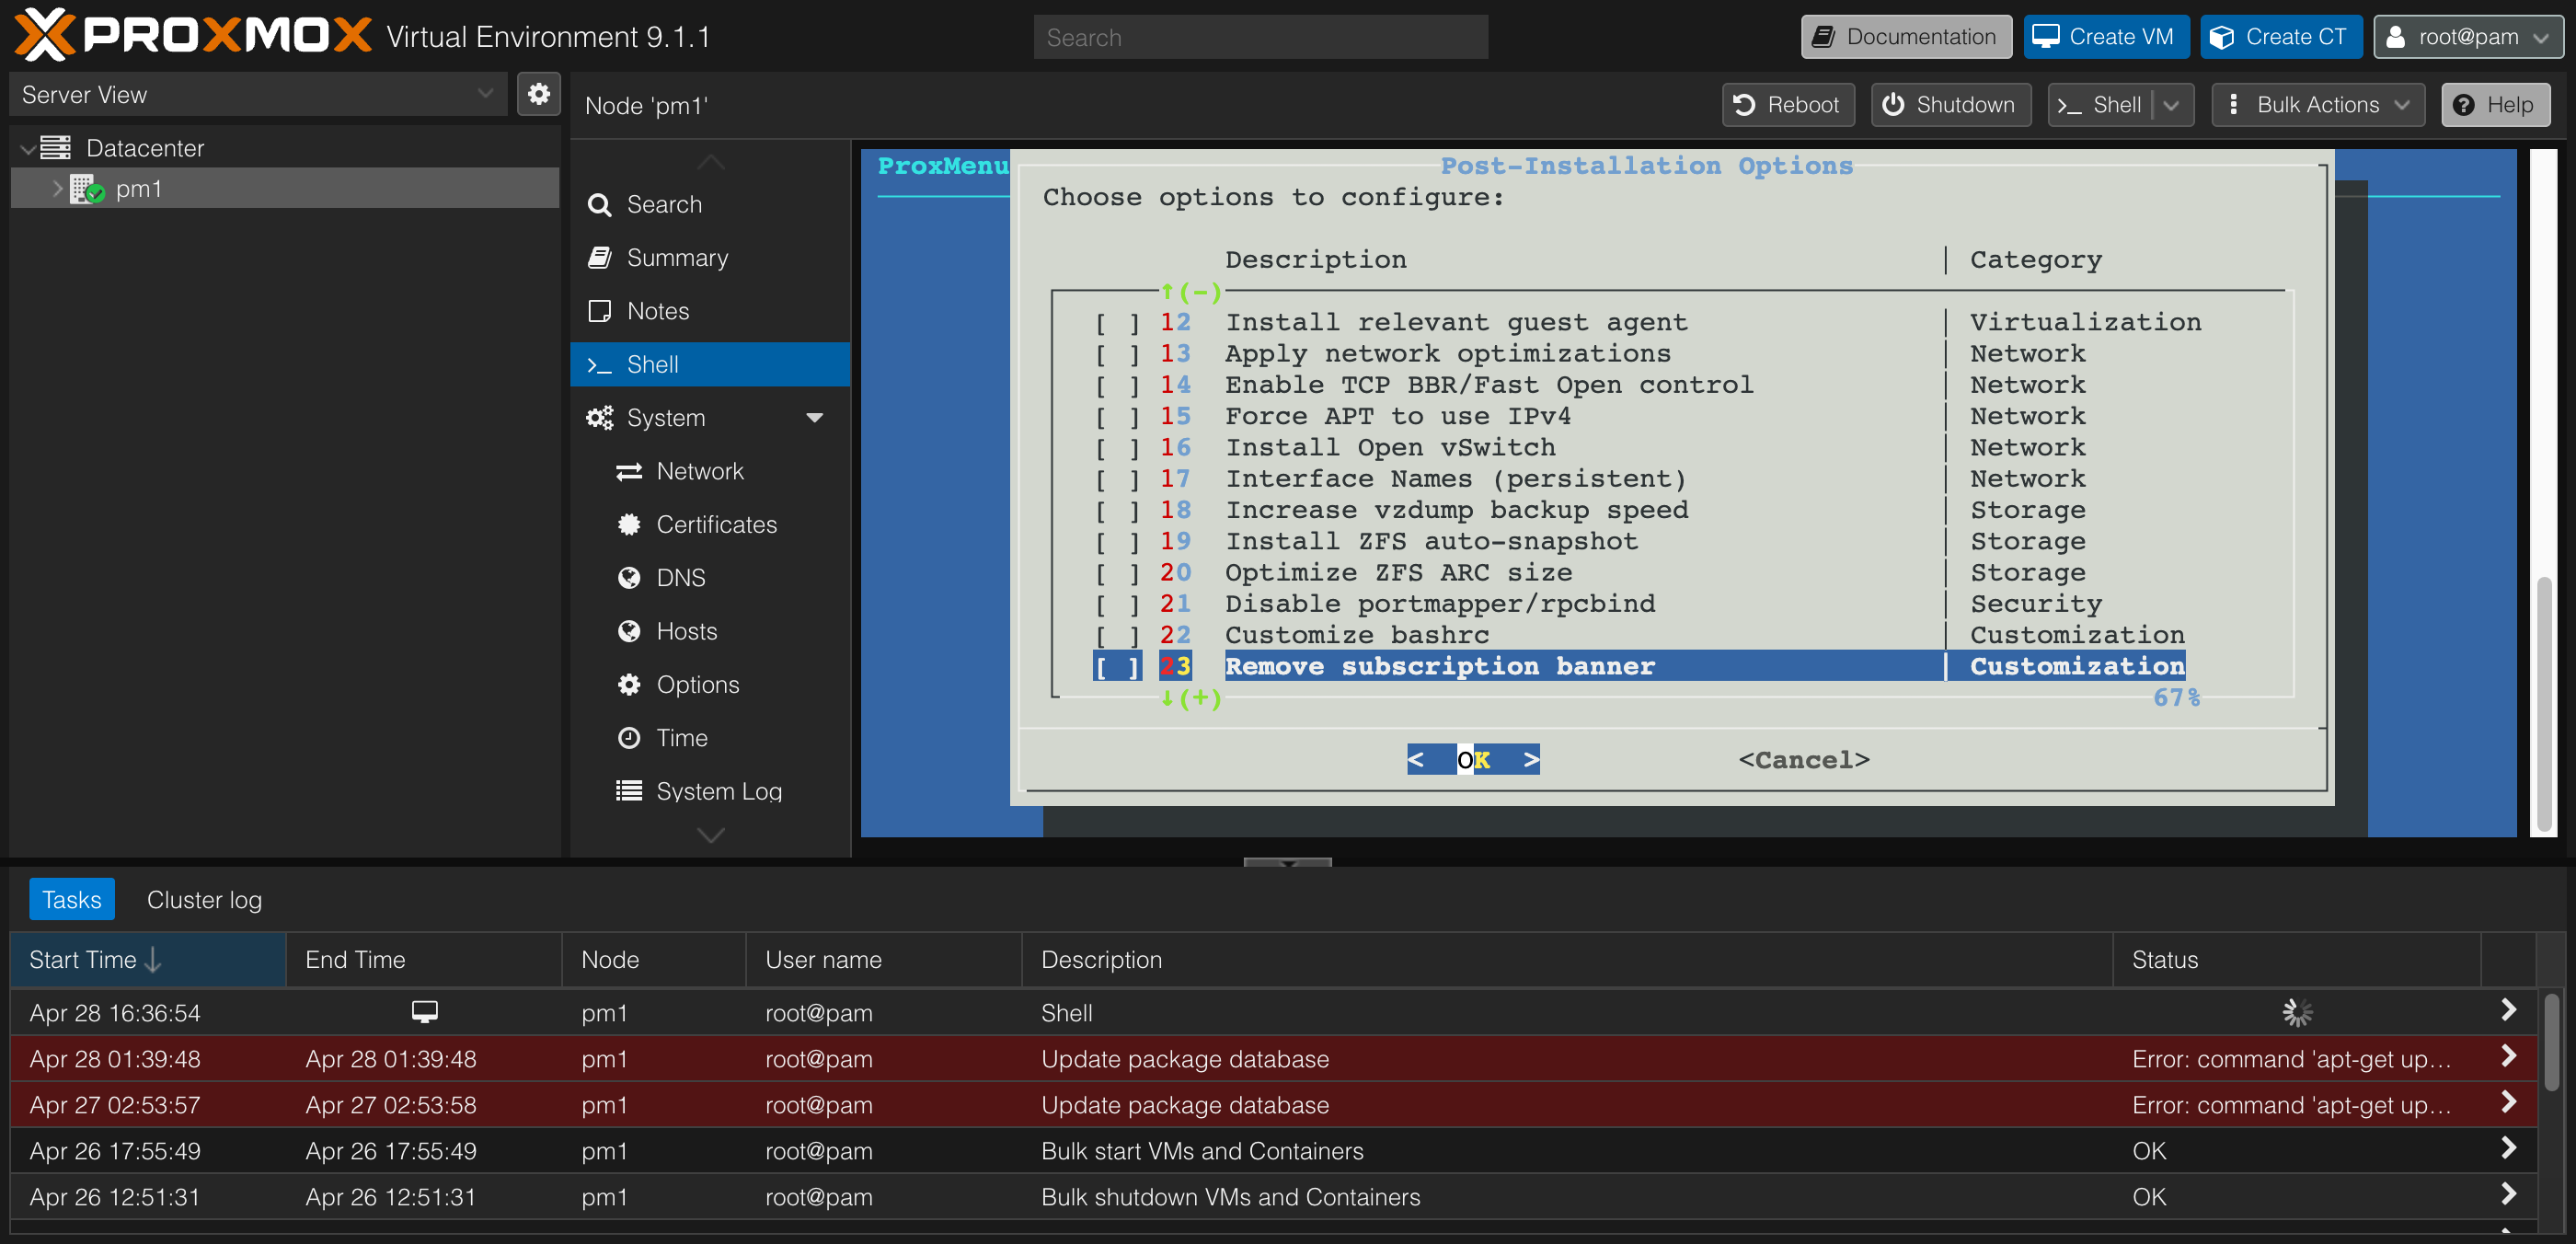 Options 13–23: Network, Storage, Security, Customization.
- 13. Apply network optimizations — selected. Writes
/etc/sysctl.d/99-network-performance.confwith sane buffer sizes, conntrack scaling, and security hardening (rp_filter=1,accept_redirects=0, etc.). ProxMenux’s recent releases dropped obsolete params liketcp_tw_recyclefor kernel 6.14+ compatibility, so kernel 6.17.2 accepts the current set cleanly. - 14. Enable TCP BBR/Fast Open control — selected. Sets the queueing discipline to
fqand the congestion control totcp_bbr, plus enables TCP Fast Open. Real-world win for any internet-facing VM (including stuff like a Tailscale relay or a self-hosted reverse proxy). Safe on modern kernels. - 15. Force APT to use IPv4 — skipped. Only useful if you’re hitting slow APT pulls over IPv6, which I’m not.
- 16. Install Open vSwitch — skipped. A single-node homelab with one Linux bridge gets nothing from OVS; it just adds complexity to your network stack. The default
vmbr0bridge is the right tool here. - 17. Interface Names (persistent) — selected. Pins your NIC name (e.g.,
enp2s0) to its MAC address using a.linkfile. Worth doing before you ever add a second NIC or do PCI passthrough — it prevents your interface from silently renaming itself when hardware changes.
Storage (18–20): just the ZFS one (if you have ZFS)
- 18. Increase vzdump backup speed — skipped. Only matters if you’ll run scheduled VM backups, which I’ll set up later when I actually have VMs.
- 19. Install ZFS auto-snapshot — skipped. The community consensus is that
cv4pve-autosnapis a better tool — it handles fsfreeze for guests and shows up in the PVE UI, neither of whichzfs-auto-snapshotdoes. - 20. Optimize ZFS ARC size — selected, conditionally. Only run this if you’re actually using ZFS. With 60 GiB of RAM, I want the ARC capped at something reasonable like 8–12 GiB instead of the default 50% of RAM. If you installed PVE on ext4 or LVM, skip this option entirely.
Security (21): conditional, and easy to misuse
- 21. Disable portmapper/rpcbind — skipped. Only run this if you don’t serve NFS from the host. rpcbind is required for NFS server functionality. I want the option of mounting an NFS share later, so I’m leaving it alone. If your host is purely a hypervisor and never an NFS server, you can disable it for a slight attack-surface reduction.
Customization (22–24): one with a known footgun
- 22. Customize bashrc — skipped. Pure cosmetic. If you like a fancier shell prompt, run it; I don’t care.
- 23. Remove subscription banner — selected, with eyes open. This is the option that kills the “no valid subscription” popup on every login. ProxMenux patches
proxmoxlib.jsand registers an APTDPkg::Post-Invokehook so updates re-apply the patch. The known failure mode: whenproxmox-widget-toolkitshipped a 5.0.5 → 5.0.6 update a while back, it broke the web UI on patched nodes (you’d get a “Failed to load/PVE/StdWorkspace.js” error). ProxMenux’s recent versions use a safer patching method and ship a Restore Banner uninstall option for exactly this scenario. If your GUI ever fails to load after a Proxmox point update, your first move is to SSH in and run that uninstall option. - 24. Set up custom MOTD banner — skipped. Cosmetic.
Monitoring & Performance (25–26): both situational
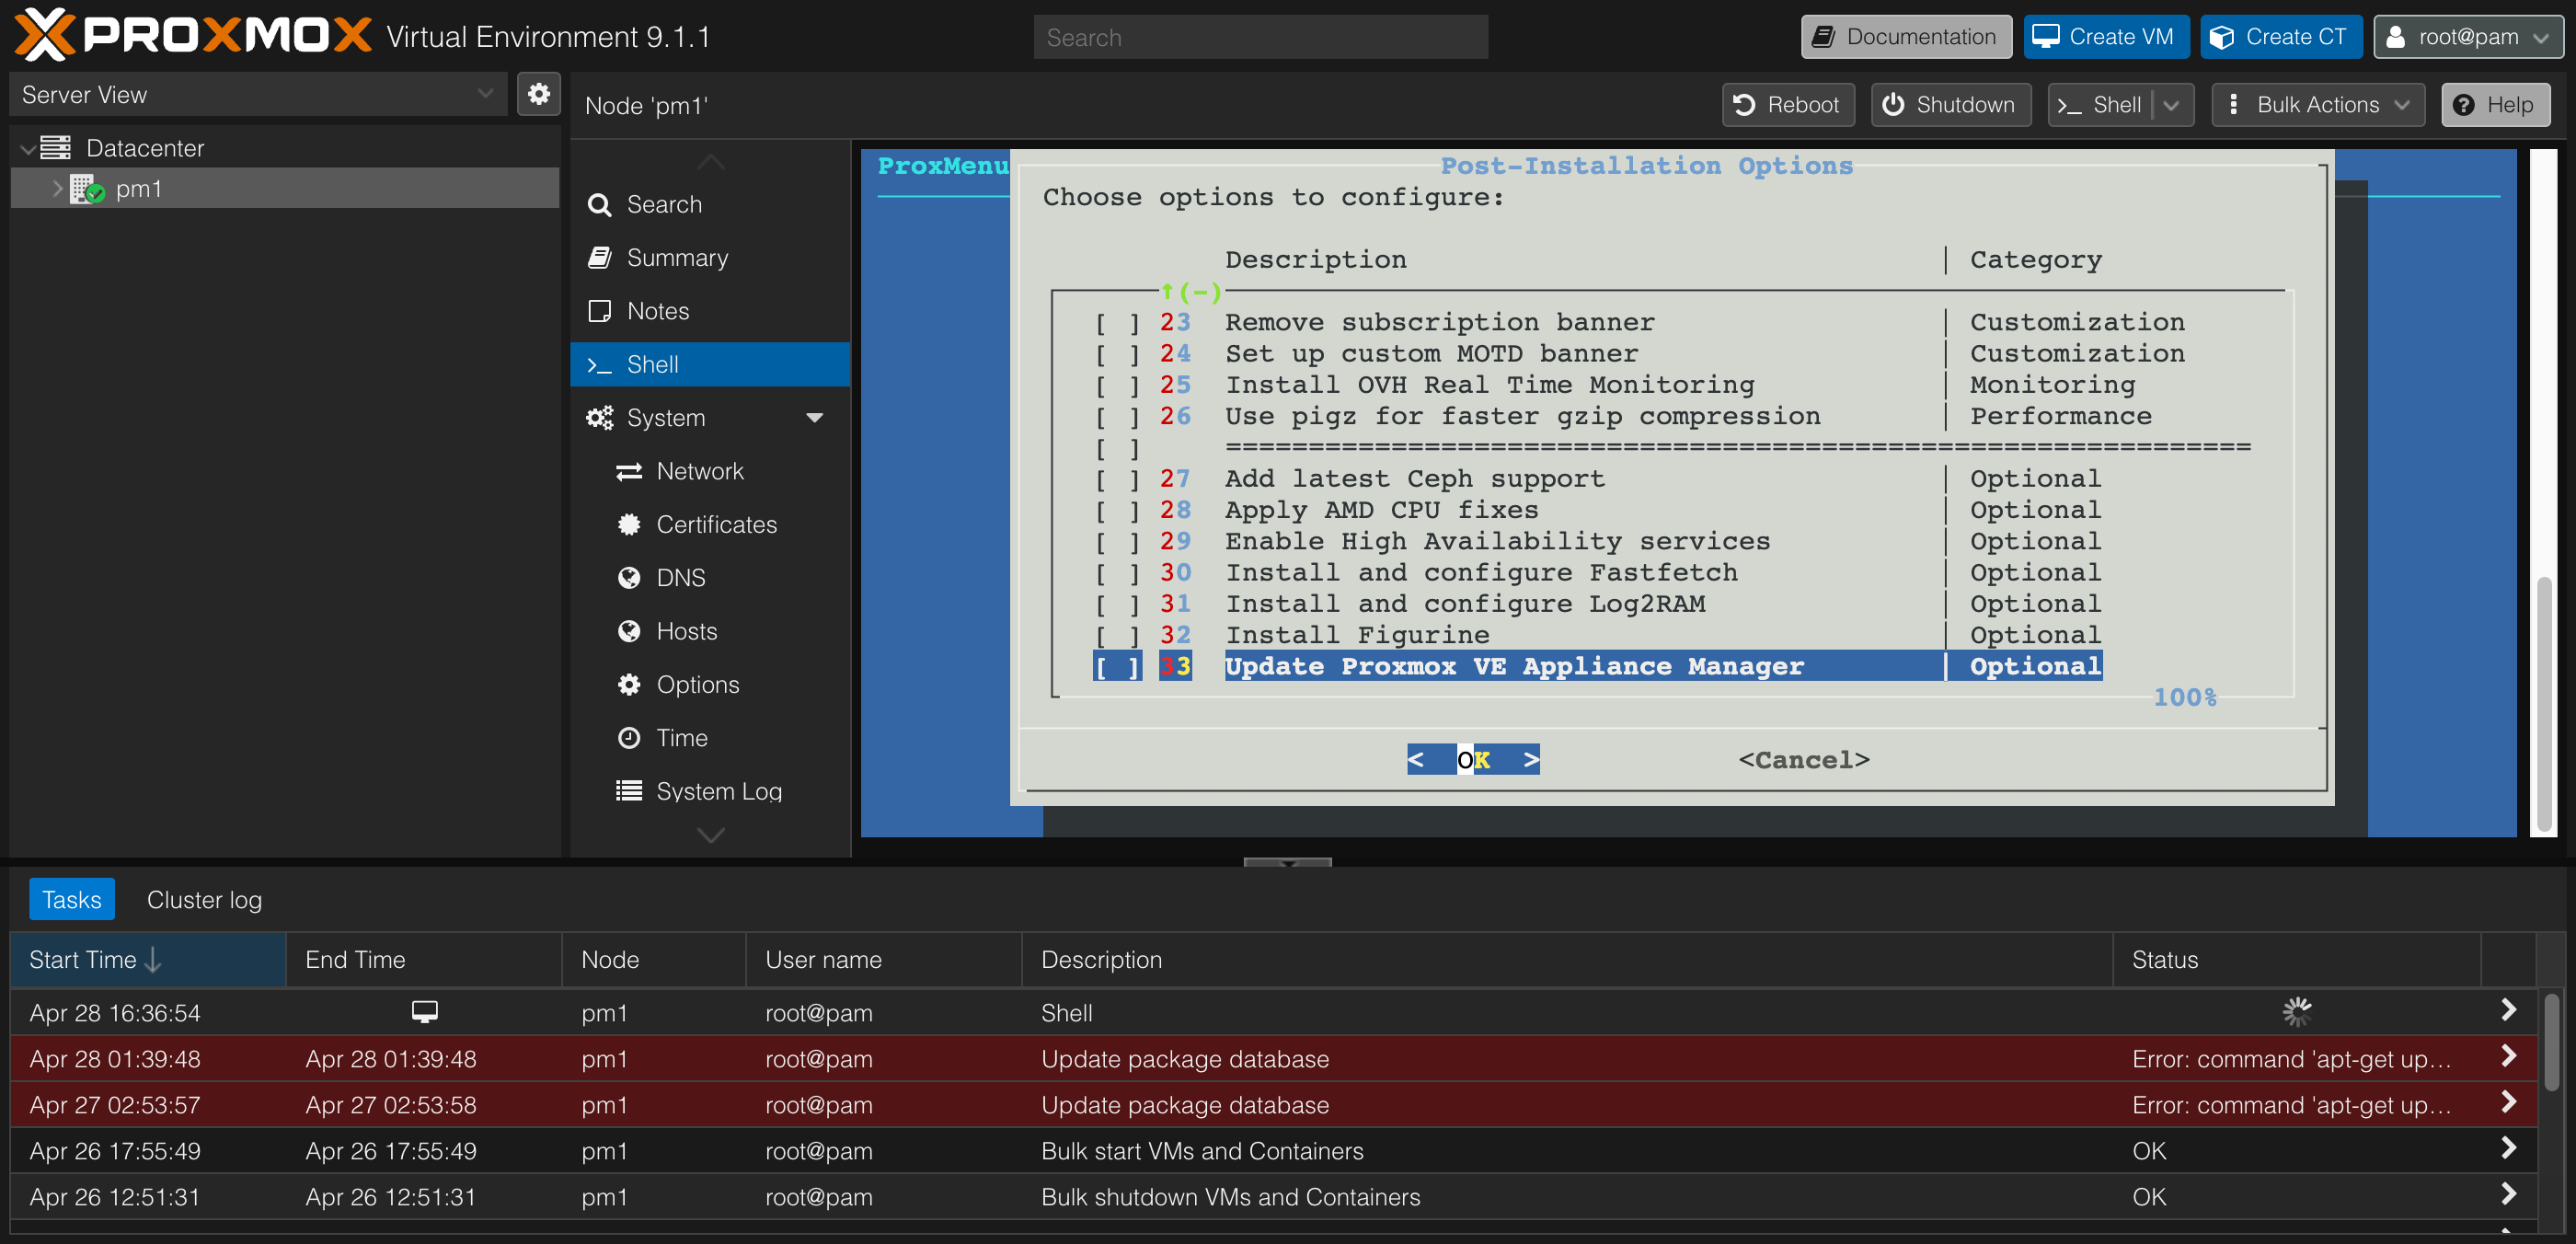 Options 23–33: the rest of the menu, including the Optional category.
- 25. Install OVH Real Time Monitoring — skipped. Specific to OVH-hosted servers; not relevant for a home network.
- 26. Use pigz for faster gzip compression — skipped. Marginal speedup on backup compression. Not zero benefit, but negligible enough that I didn’t bother.
Optional (27–33): one cluster-killer, one CPU win, one wear-saver
- 27. Add latest Ceph support — skipped. Cluster-only storage. Irrelevant on a single node.
- 28. Apply AMD CPU fixes — selected. Adds AMD-specific kernel parameters (
idle=nomwait,kvm.ignore_msrs=1) that reduce some weird KVM warning spam and improve idle behavior on Zen-architecture CPUs. Perfect for the 5800H. - 29. Enable High Availability services — skipped, and you should actively skip this on a single node. The HA stack (
corosync,pve-ha-lrm,pve-ha-crm) burns CPU and floods your logs with quorum-related warnings when there’s no cluster to be high-availability for. Leave it off. - 30. Install and configure Fastfetch — skipped. Cosmetic — pretty system-info display at login.
- 31. Install and configure Log2RAM — selected. Mounts
/var/login RAM and syncs to disk periodically. Reduces SSD/NVMe write wear from constant log churn. Caveat: there’s an open GitHub discussion (#107) where a verbose service filled the RAM ring, which then filled the rootfs as it sync’d; ProxMenux’s recent journald sizing (option 8 above) mitigates this by capping log volume in the first place. The two pair well — I ran them together. - 32. Install Figurine — skipped. Cosmetic ASCII-art hostname banner at SSH login.
- 33. Update Proxmox VE Appliance Manager — skipped. Situational; only relevant if you’re using PVE’s appliance manager features.
My final selection
Here’s what I had checked when I hit Enter:
Run: 1, 2, 3, 4, 7, 8, 10, 13, 14, 17, 20, 23, 28, 31
Skip: 5, 6, 9, 11, 12, 15, 16, 18, 19, 21, 22, 24, 25, 26, 27, 29, 30, 32, 33
That’s 14 of 33 options — a touch under half the script.
A detour into option 1: which utilities to install
Option 1 — “Install common system utilities” — opens its own multi-select sub-menu where you pick which CLI tools to install. Some of these are obviously useful, some are situational, and some are misleading on AMD hardware.
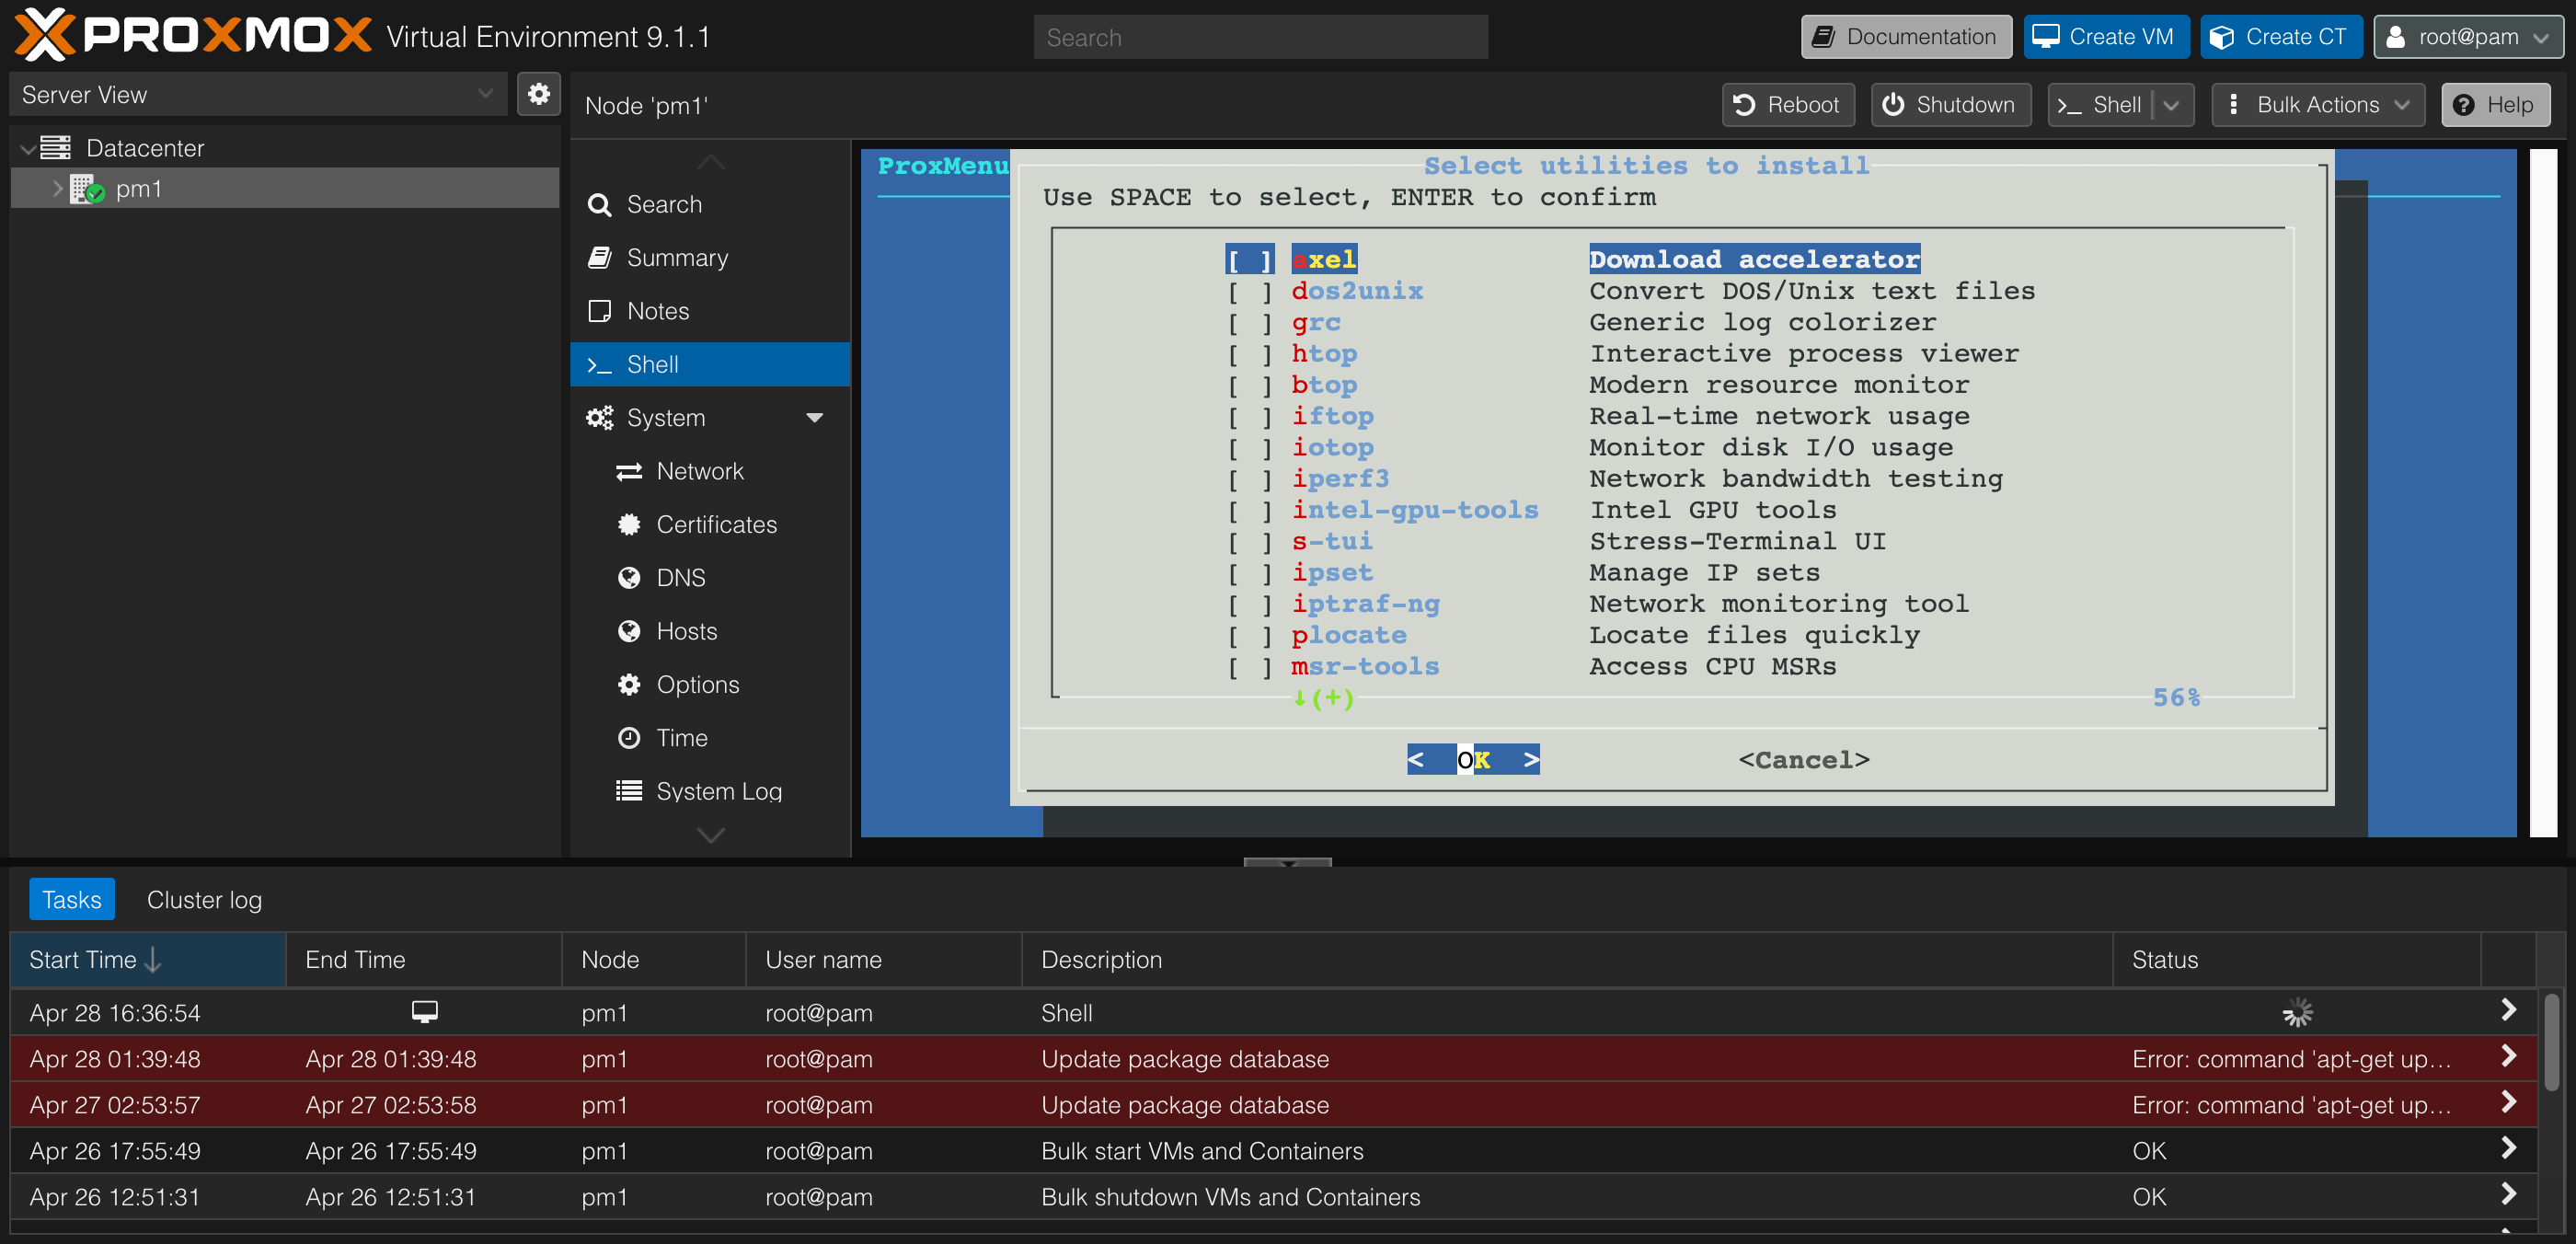 Utility selection, first page.
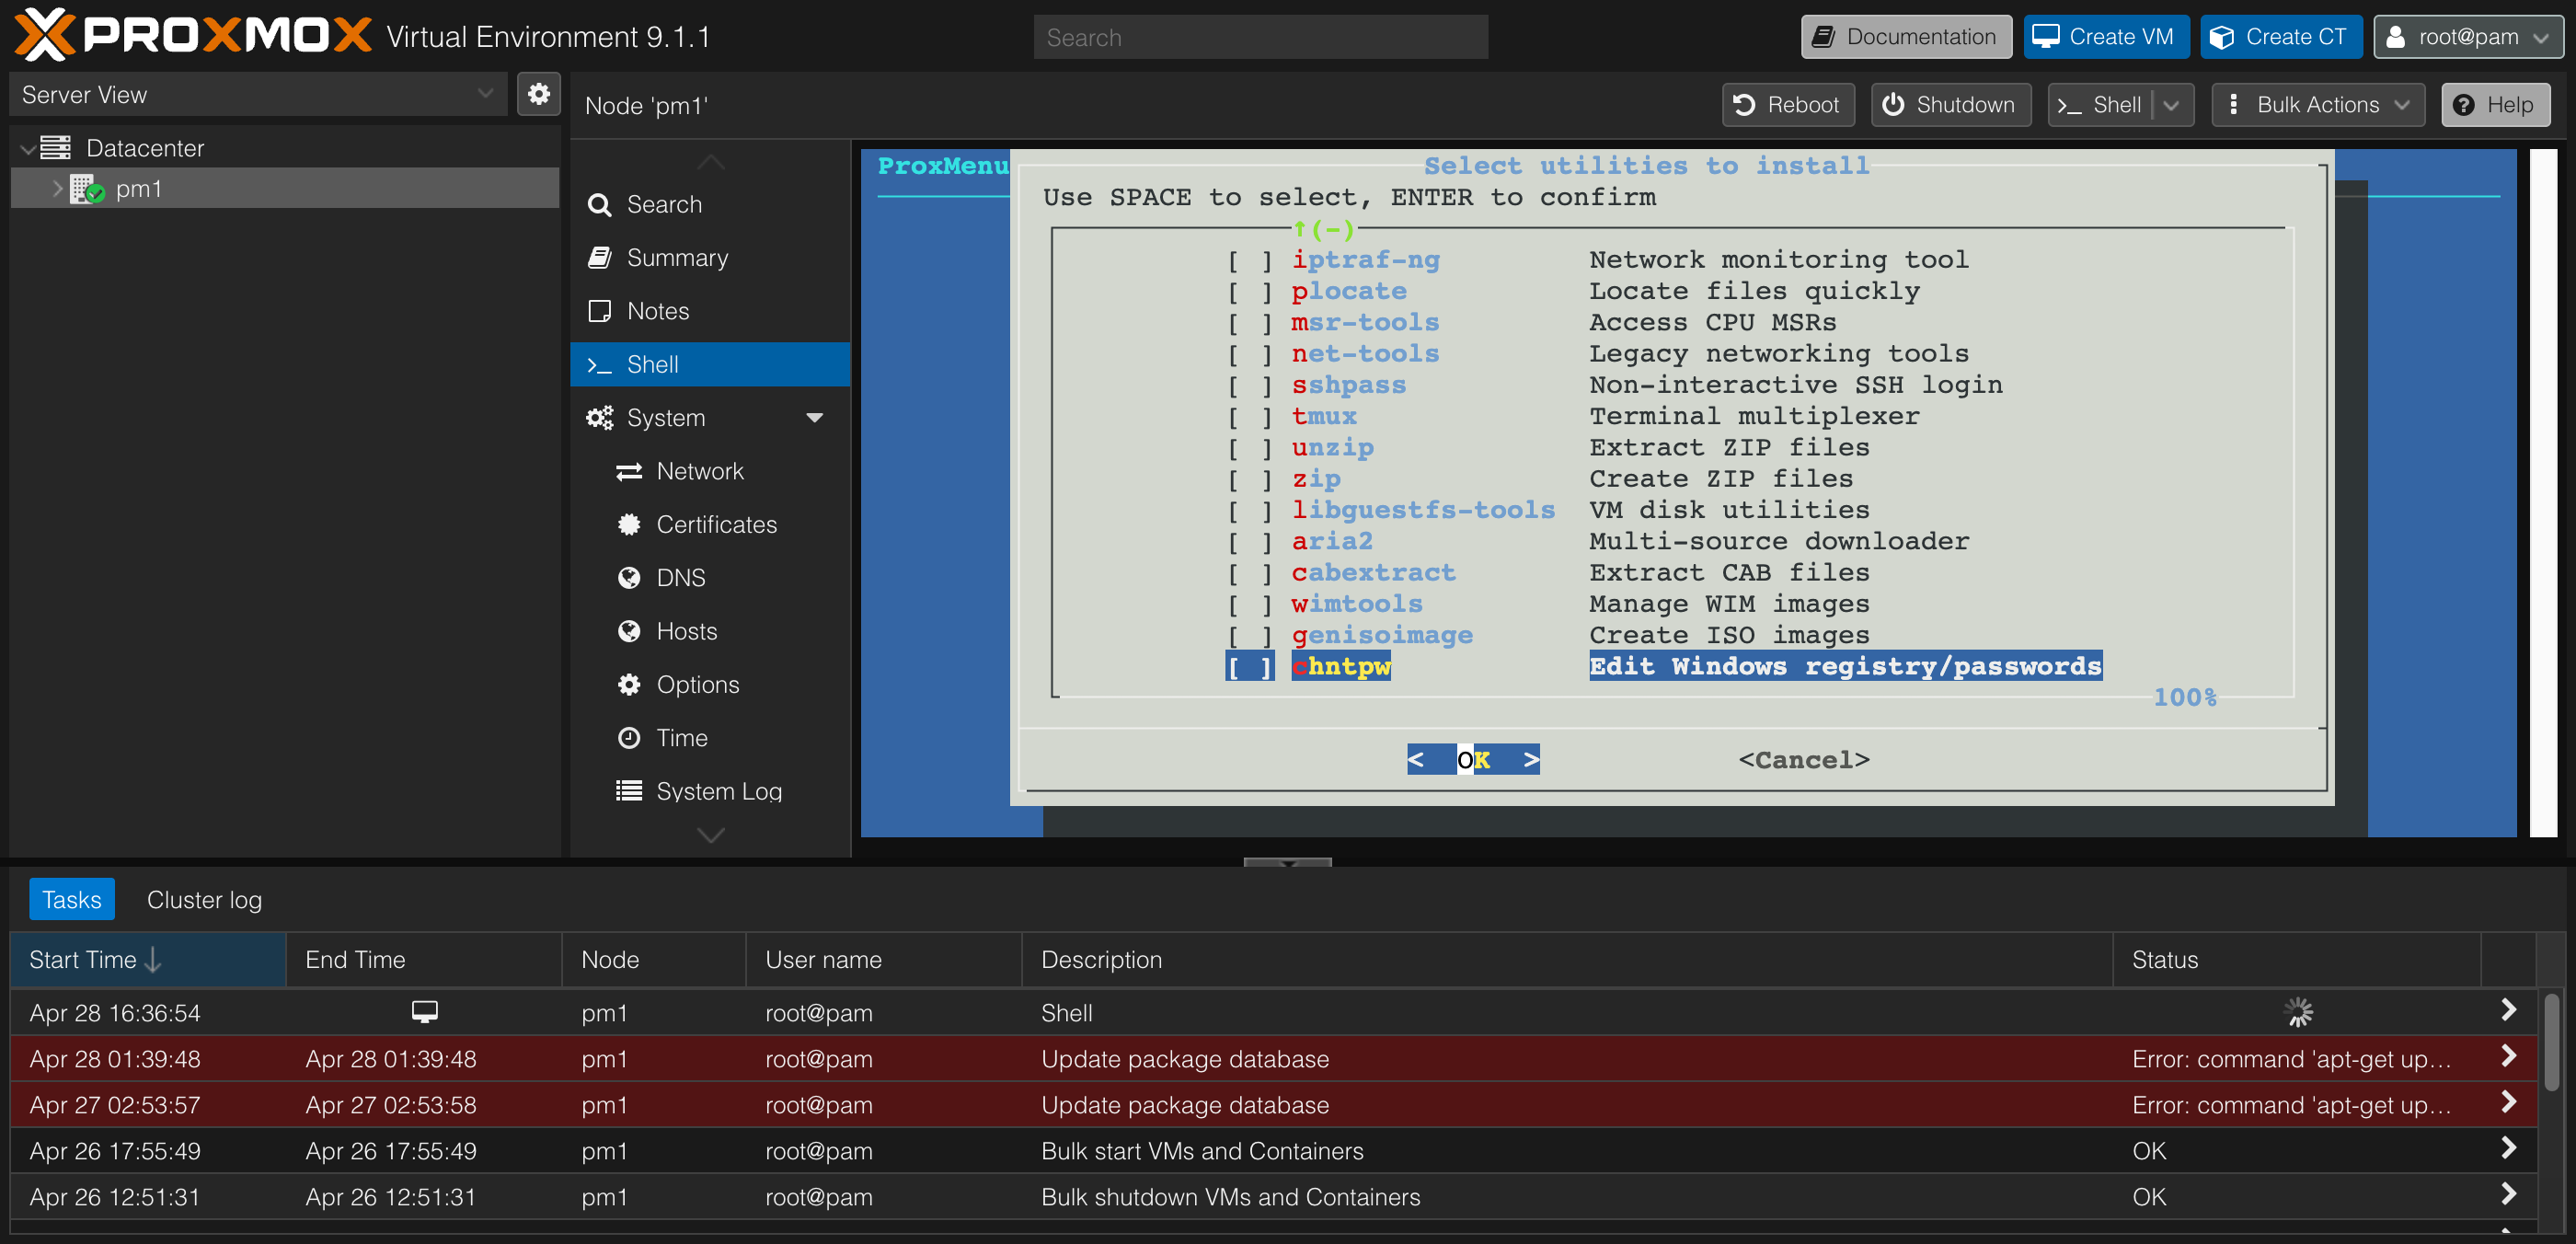 Utility selection, second page.
Here’s what I picked from the list, and what I left behind.
Selected:
- htop — better-looking process viewer than
top. The default for anyone who’s used Linux for more than a week. - iotop — disk I/O monitoring per process. Indispensable when you’re trying to figure out which VM is hammering your storage.
- iftop — real-time per-connection network usage.
- iperf3 — network bandwidth testing between hosts and VMs. I use this constantly when bringing up new VLANs.
- ipset — needed if you ever use Proxmox firewall rules with IP lists.
- iptraf-ng — network monitoring with a nicer UI than
iftopfor some workflows. - plocate — fast
locatereplacement.locate filenameis the laziest way to find a file you misplaced. - net-tools — gives you the legacy
ifconfig,netstat,route, etc. They’re “deprecated” in favor ofipandss, but old habits. - tmux — terminal multiplexer. If you ever SSH in to do something that takes more than 30 seconds, you want tmux so a dropped connection doesn’t kill your session.
- unzip + zip — basic archive handling.
- libguestfs-tools — lets you inspect and modify VM disk images from the host. Useful for “I need to recover a file from a VM that won’t boot” scenarios.
- dos2unix — handy when dealing with files copied from Windows VMs.
- grc — colorizes the output of common commands (logs, traceroute, ping). Makes log-skimming faster.
- msr-tools — tools for reading and writing CPU MSRs. ProxMenux’s option 28 (AMD CPU fixes) wants this.
Skipped:
- axel and aria2 — download accelerators. I never need to download anything fast enough for these to matter.
- btop — modern resource monitor. Picked
htopinstead since I don’t need both. - intel-gpu-tools — would be useful for an Intel iGPU. I have an AMD Radeon iGPU, so this package is meaningless on my hardware.
- s-tui — stress-testing UI. Niche use case.
- sshpass — non-interactive SSH password authentication. I use SSH keys, so this is mostly irrelevant (and discouraged for security reasons).
- cabextract, wimtools, chntpw, genisoimage — all Windows-VM-related utilities (CAB extraction, WIM image manipulation, Windows registry editing, ISO creation). Useful if you build or repair Windows VMs from the Proxmox host. I don’t, so I left them out.
If you want a “just give me the safe defaults” pick: htop, iotop, iftop, iperf3, ipset, iptraf-ng, plocate, net-tools, tmux, unzip, zip, libguestfs-tools, dos2unix, grc, msr-tools.
Running the script
Once everything was selected, hitting Enter kicked off the run. ProxMenux processes selected options sequentially, with progress feedback for each. Total runtime was a few minutes — most of that was the apt dist-upgrade from option 4 pulling down the differences between the Enterprise and no-subscription repos.
Things to expect during the run:
- Option 4 will likely prompt you a couple of times during the upgrade for things like “keep or replace
/etc/sysctl.conf?” — keep the local version unless you have a reason not to. - Option 23 (banner removal) takes effect after a hard refresh of the web UI (Ctrl-Shift-R in the browser).
- A reboot is recommended after the run — both for kernel updates from option 4 and to let Log2RAM (option 31) properly initialize.
After the reboot, the web UI’s yellow subscription warning was gone, the login popup was gone, apt update ran clean, and the system was tuned and ready for VMs.
What I’d actually verify after the run
A few quick sanity checks I ran after rebooting:
1
2
3
4
5
6
7
8
9
10
11
12
13
14
15
16
17
18
# Confirm the Enterprise repo is disabled and no-subscription is active
cat /etc/apt/sources.list.d/*.list

# Confirm apt update has no errors
apt update

# Check that Log2RAM is mounted
df -h /var/log
# /var/log should show as a tmpfs mount

# Check that journald is size-capped
journalctl --disk-usage

# Verify NIC name is now persistent
cat /etc/systemd/network/*.link

# (If you ran option 11 IOMMU): confirm it's in the live kernel cmdline
cat /proc/cmdline | grep amd_iommu
If any of these come back unexpected — especially apt update still erroring, or /proc/cmdline not showing your IOMMU flag despite running option 11 on an EFI install — that’s where to start troubleshooting.
What I didn’t run, and what I might run later
A few options I deliberately deferred rather than rejected:
- Option 11 (IOMMU/VFIO) — I’ll run this when I’m ready to do PCIe passthrough, which I’ll cover in a separate post. The verification step on EFI/systemd-boot installs is fiddly enough that I want to do it deliberately rather than as part of a batch.
- Option 18 (vzdump backup speed) — I’ll enable this when I actually have scheduled backups configured. No point optimizing speed for a workload that doesn’t exist yet.
And a few that I’m confident I’ll never run on this box:
- Options 27, 29 (Ceph and HA) — single-node, never will be a cluster.
- Options 22, 24, 30, 32 — cosmetic, not my taste.
- Option 16 (Open vSwitch) — overkill for one bridge.
Closing thoughts
ProxMenux is a solid tool, but its menu is structured like a buffet — everything is laid out in front of you with very little opinion on what belongs on your plate. For a homelab user who’s seen a Proxmox install screen for the first time, that’s overwhelming. The right framing, for me, was treating the script as a menu of optional tweaks rather than a checklist to complete. Skip anything cluster-related, skip anything cosmetic, skip anything that solves a problem you don’t have, and you end up with a pretty short list of high-value options.
The single biggest win was option 4 — switching to the no-subscription repo and getting apt update working clean. Everything else was incremental. The next time I do a fresh Proxmox install, this is the exact list I’ll come back to.
If you’ve run a different selection or have strong opinions on the ones I skipped, I’d love to hear about it. The whole point of writing this down was to have a baseline to push back on.
Special thanks to Claude (Anthropic) for the deep research on each ProxMenux option — going through every numbered entry against the docs, changelog, and known issues, and helping me build the actual selection list above. The recommendations and the writing are mine; the patient cross-referencing was the AI’s.
Notes
A quick note
This blog is a hobby project, and I’m not an expert on the topics I write about — just someone who enjoys learning in public and sharing what I find along the way. That means I’ll sometimes get things wrong, oversimplify, or miss nuance, and I’d genuinely love to hear about it.
If you have thoughts, corrections, questions, or just want to chat about this post, please join the conversation over on GitHub Discussions.
All friendly perspectives are welcome — I’m here to learn.
Last updated: [Saturday, 9th May 2026].