Installing Chirpy on GitHub Pages with a Cloudflare custom domain
A warm, step-by-step walkthrough for launching a Chirpy Jekyll blog on GitHub Pages and wiring up a custom domain through Cloudflare — written for people who are brand-new to static sites.
So you want a clean, fast, text-first blog that you actually own. This guide takes you from zero to a live Chirpy site running on GitHub Pages at your own domain (mine is georgelunski.com) with Cloudflare handling DNS. No Ruby experience required — just a little patience and a willingness to click around GitHub.
TL;DR — Use the
chirpy-startertemplate on GitHub, switch the repo’s Pages source to GitHub Actions, point your apex domain at GitHub’s four IPs via Cloudflare (DNS-only at first so Let’s Encrypt can issue a cert), then flip the proxy back on with SSL/TLS mode = Full (Strict). Edit_config.yml, drop a Markdown file in_posts/, push, done.
What Chirpy is and why you’d pick it
Chirpy is a mature, text-focused Jekyll theme that’s become something of a default for technical blogs. The current release is v7.5.0 (March 2026), and it ships with the features most writers actually want: automatic dark/light mode, a collapsible sidebar, categories, tags, and archive pages, a built-in search, syntax-highlighted code blocks, MathJax and Mermaid diagram support, per-post table of contents, featured images with LQIP placeholders, and tasteful typography out of the box.
The final result is a site that looks polished without any design work from you — think of it as the “Hacker News meets a personal notebook” aesthetic. You write Markdown; Chirpy does the rest.
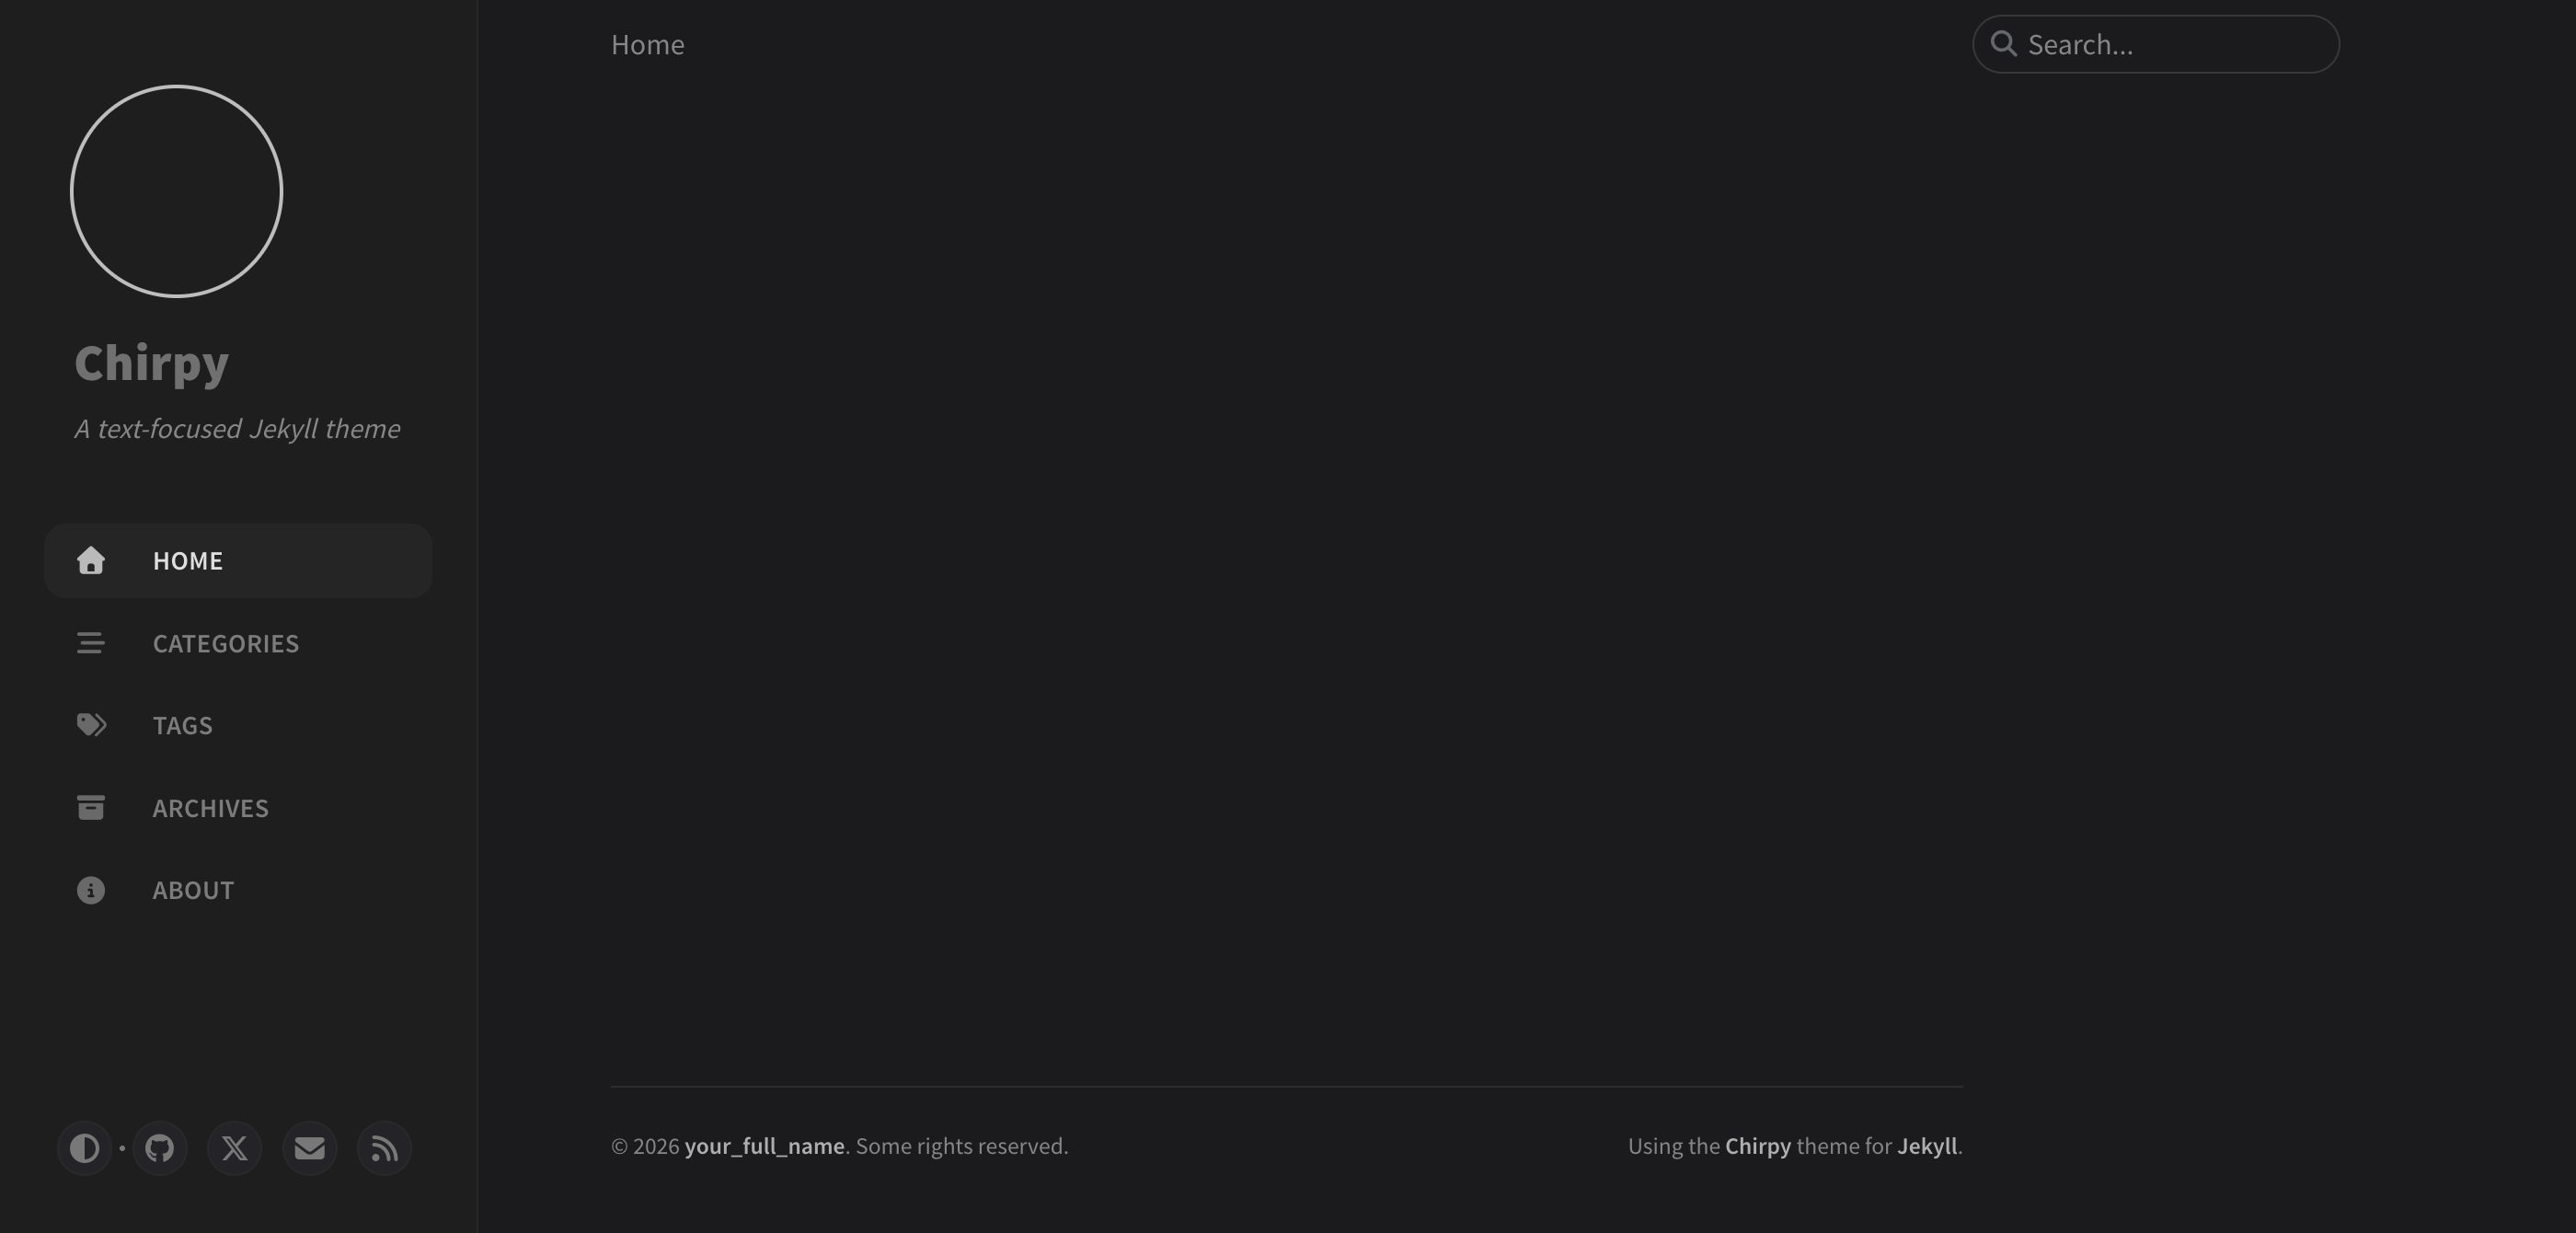 Chirpy Preview
Before you start
You’ll need three things, two of which are free:
- A GitHub account. Free tier is fine — just keep your repo public.
- A domain name (optional). Skip this and your site lives at
username.github.io. - A Cloudflare account (optional). Only needed if you want Cloudflare’s DNS, CDN, or analytics. Any DNS host works — this post just happens to use Cloudflare because that’s what I use.
If you’re going domain-free for now, you can follow everything below except Step 4.
Step 1: Spin up your repo from the starter template
Chirpy’s maintainers publish a companion repo called chirpy-starter that contains exactly the files you need — nothing more. This is the path the official docs recommend, and it’s the one you want.
- Go to https://github.com/cotes2020/chirpy-starter.
- Click the green Use this template button → Create a new repository.
- Name your repo. The convention for a personal site is
<your-username>.github.io(lowercase), which gives you the freehttps://<username>.github.ioURL automatically. - Set visibility to Public.
- Click Create repository.
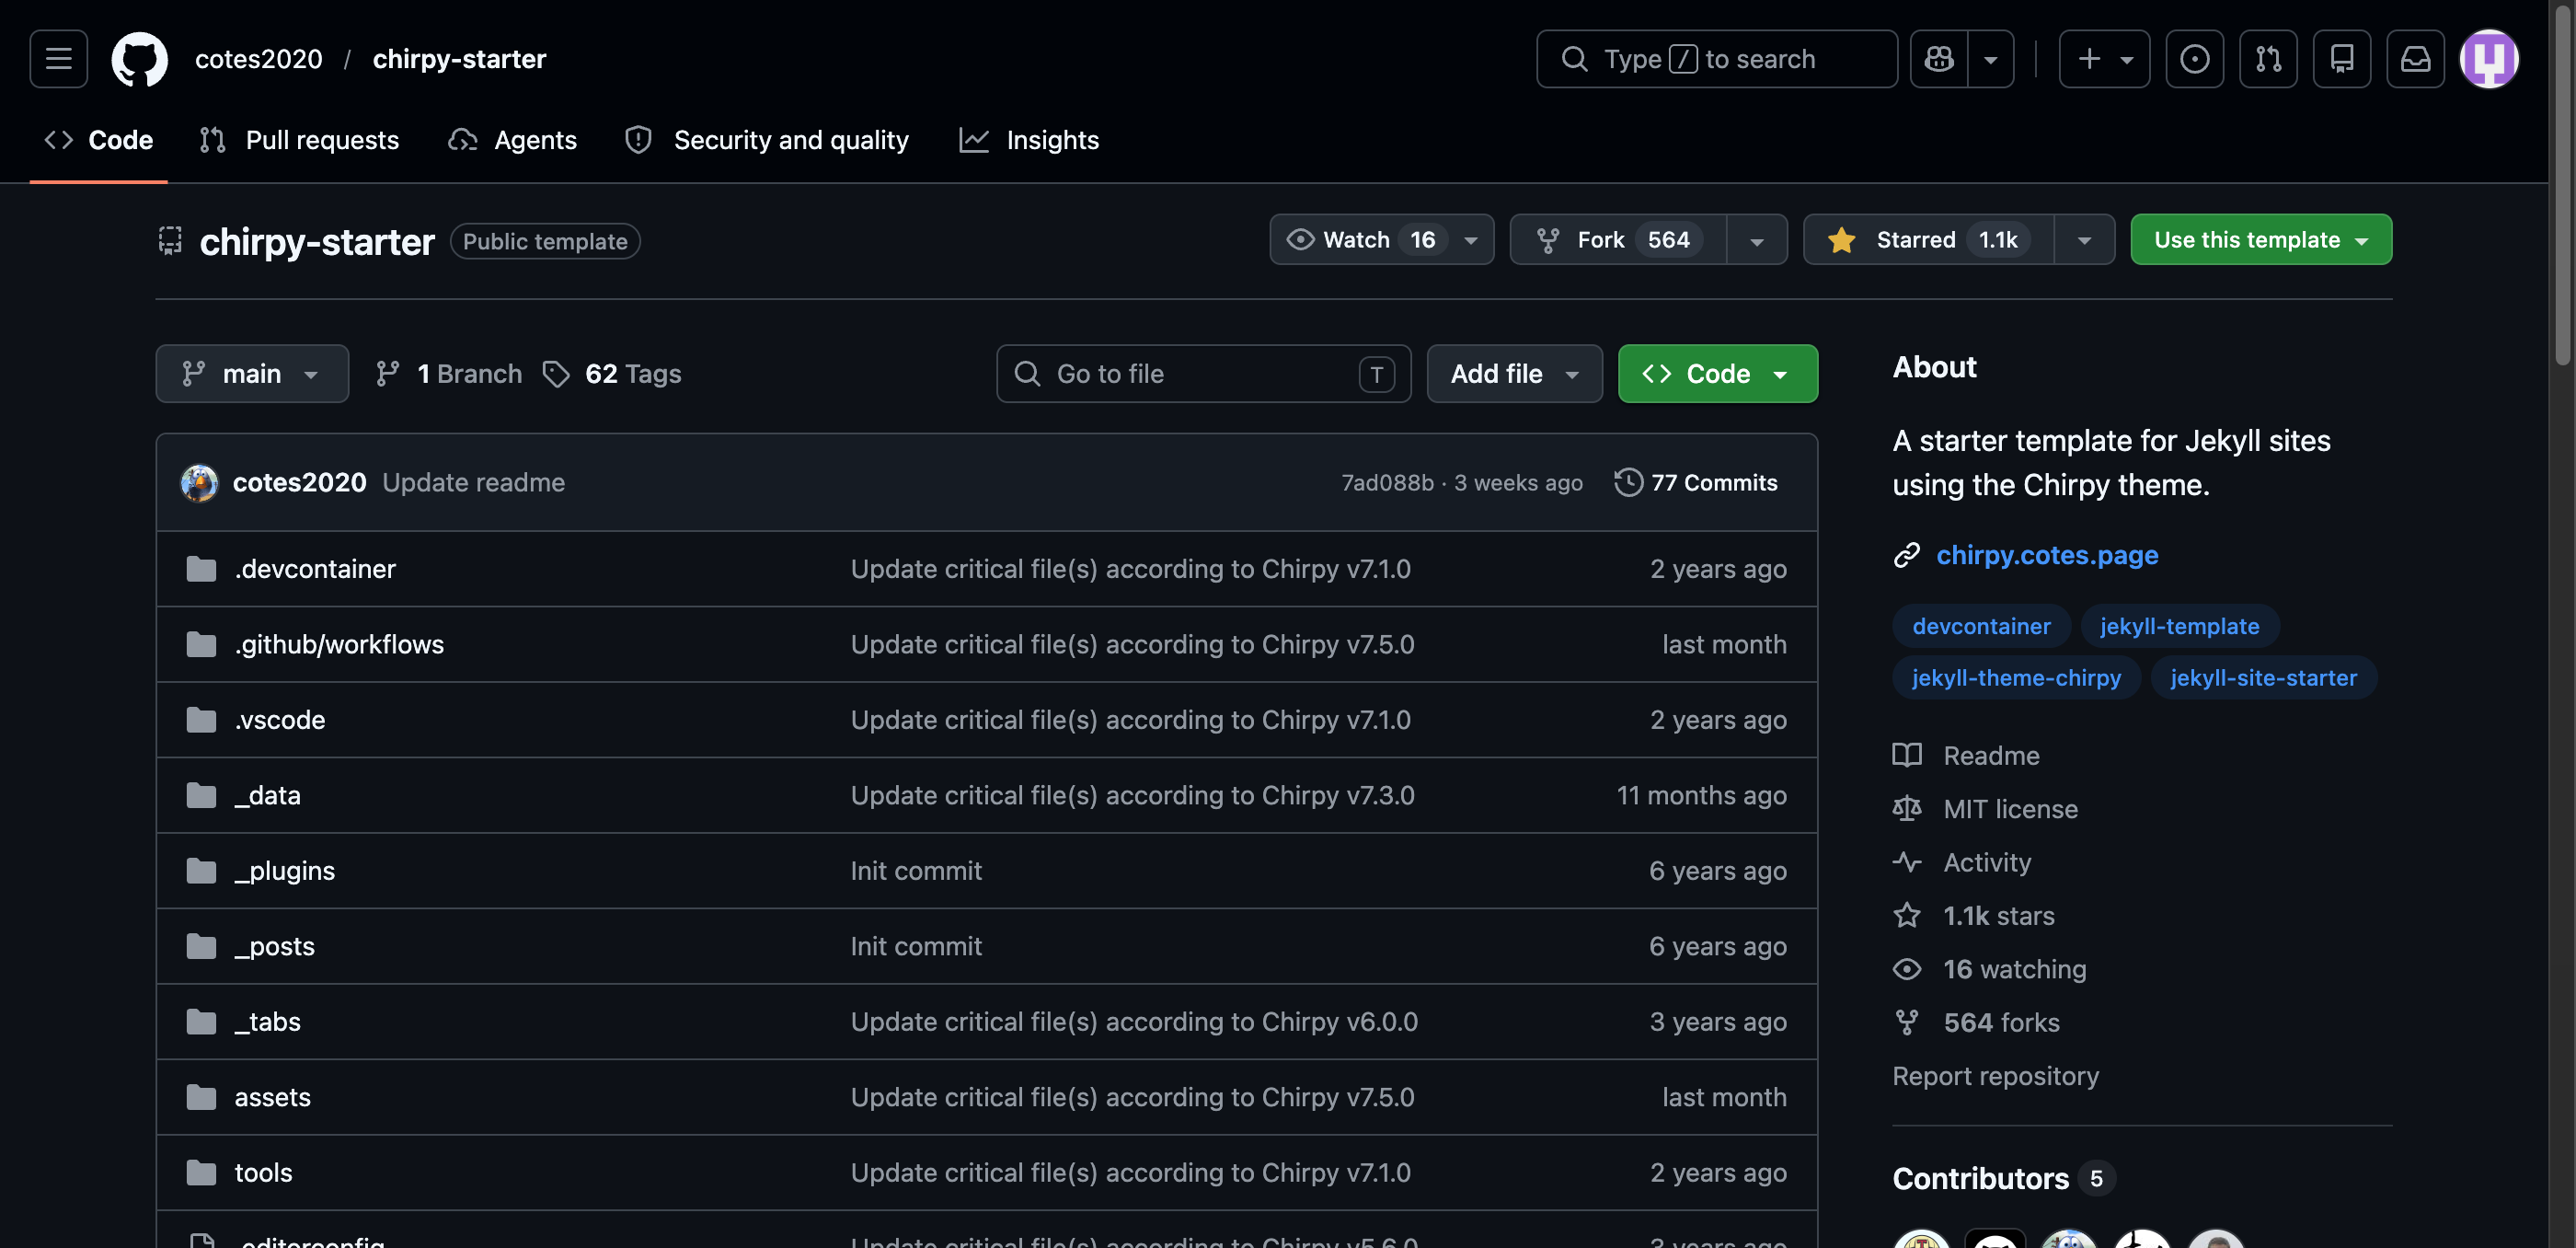 Template
GitHub has a separate “special” repo named
<username>/<username>that powers your profile README. That’s a different repo from the user-site repo (<username>.github.io). If you ever host Pages out of the profile-README repo, the rendered site will take precedence over the README card on your profile — a tradeoff to keep in mind.
Step 2: Expect the first build to fail (and fix it in 30 seconds)
Right after you create the repo, GitHub Actions will try to run the bundled .github/workflows/pages-deploy.yml workflow. It will fail. Don’t panic — this is expected. The workflow needs GitHub Pages to be configured to deploy from Actions rather than from a branch, and that toggle is off by default.
Flip it:
- In your new repo, go to Settings → Pages.
- Under Build and deployment, find the Source dropdown. It defaults to “Deploy from a branch.”
- Change it to GitHub Actions.
 GitHub Actions
Now re-run the workflow:
- Click the Actions tab at the top of the repo.
- Open the failed “Initial commit” (or “Build and Deploy”) run.
- Click Re-run all jobs in the top right.
Give it roughly a minute. When you see green checkmarks on both the build and deploy jobs and a Success status, your site is live at https://<username>.github.io. Visit it to confirm.
The
pages-deploy.ymlworkflow uses the nativeactions/deploy-pagesaction, so there’s nogh-pagesbranch anywhere. Everything goes through GitHub’s Pages environment. Ruby is pinned to 3.3 in CI.
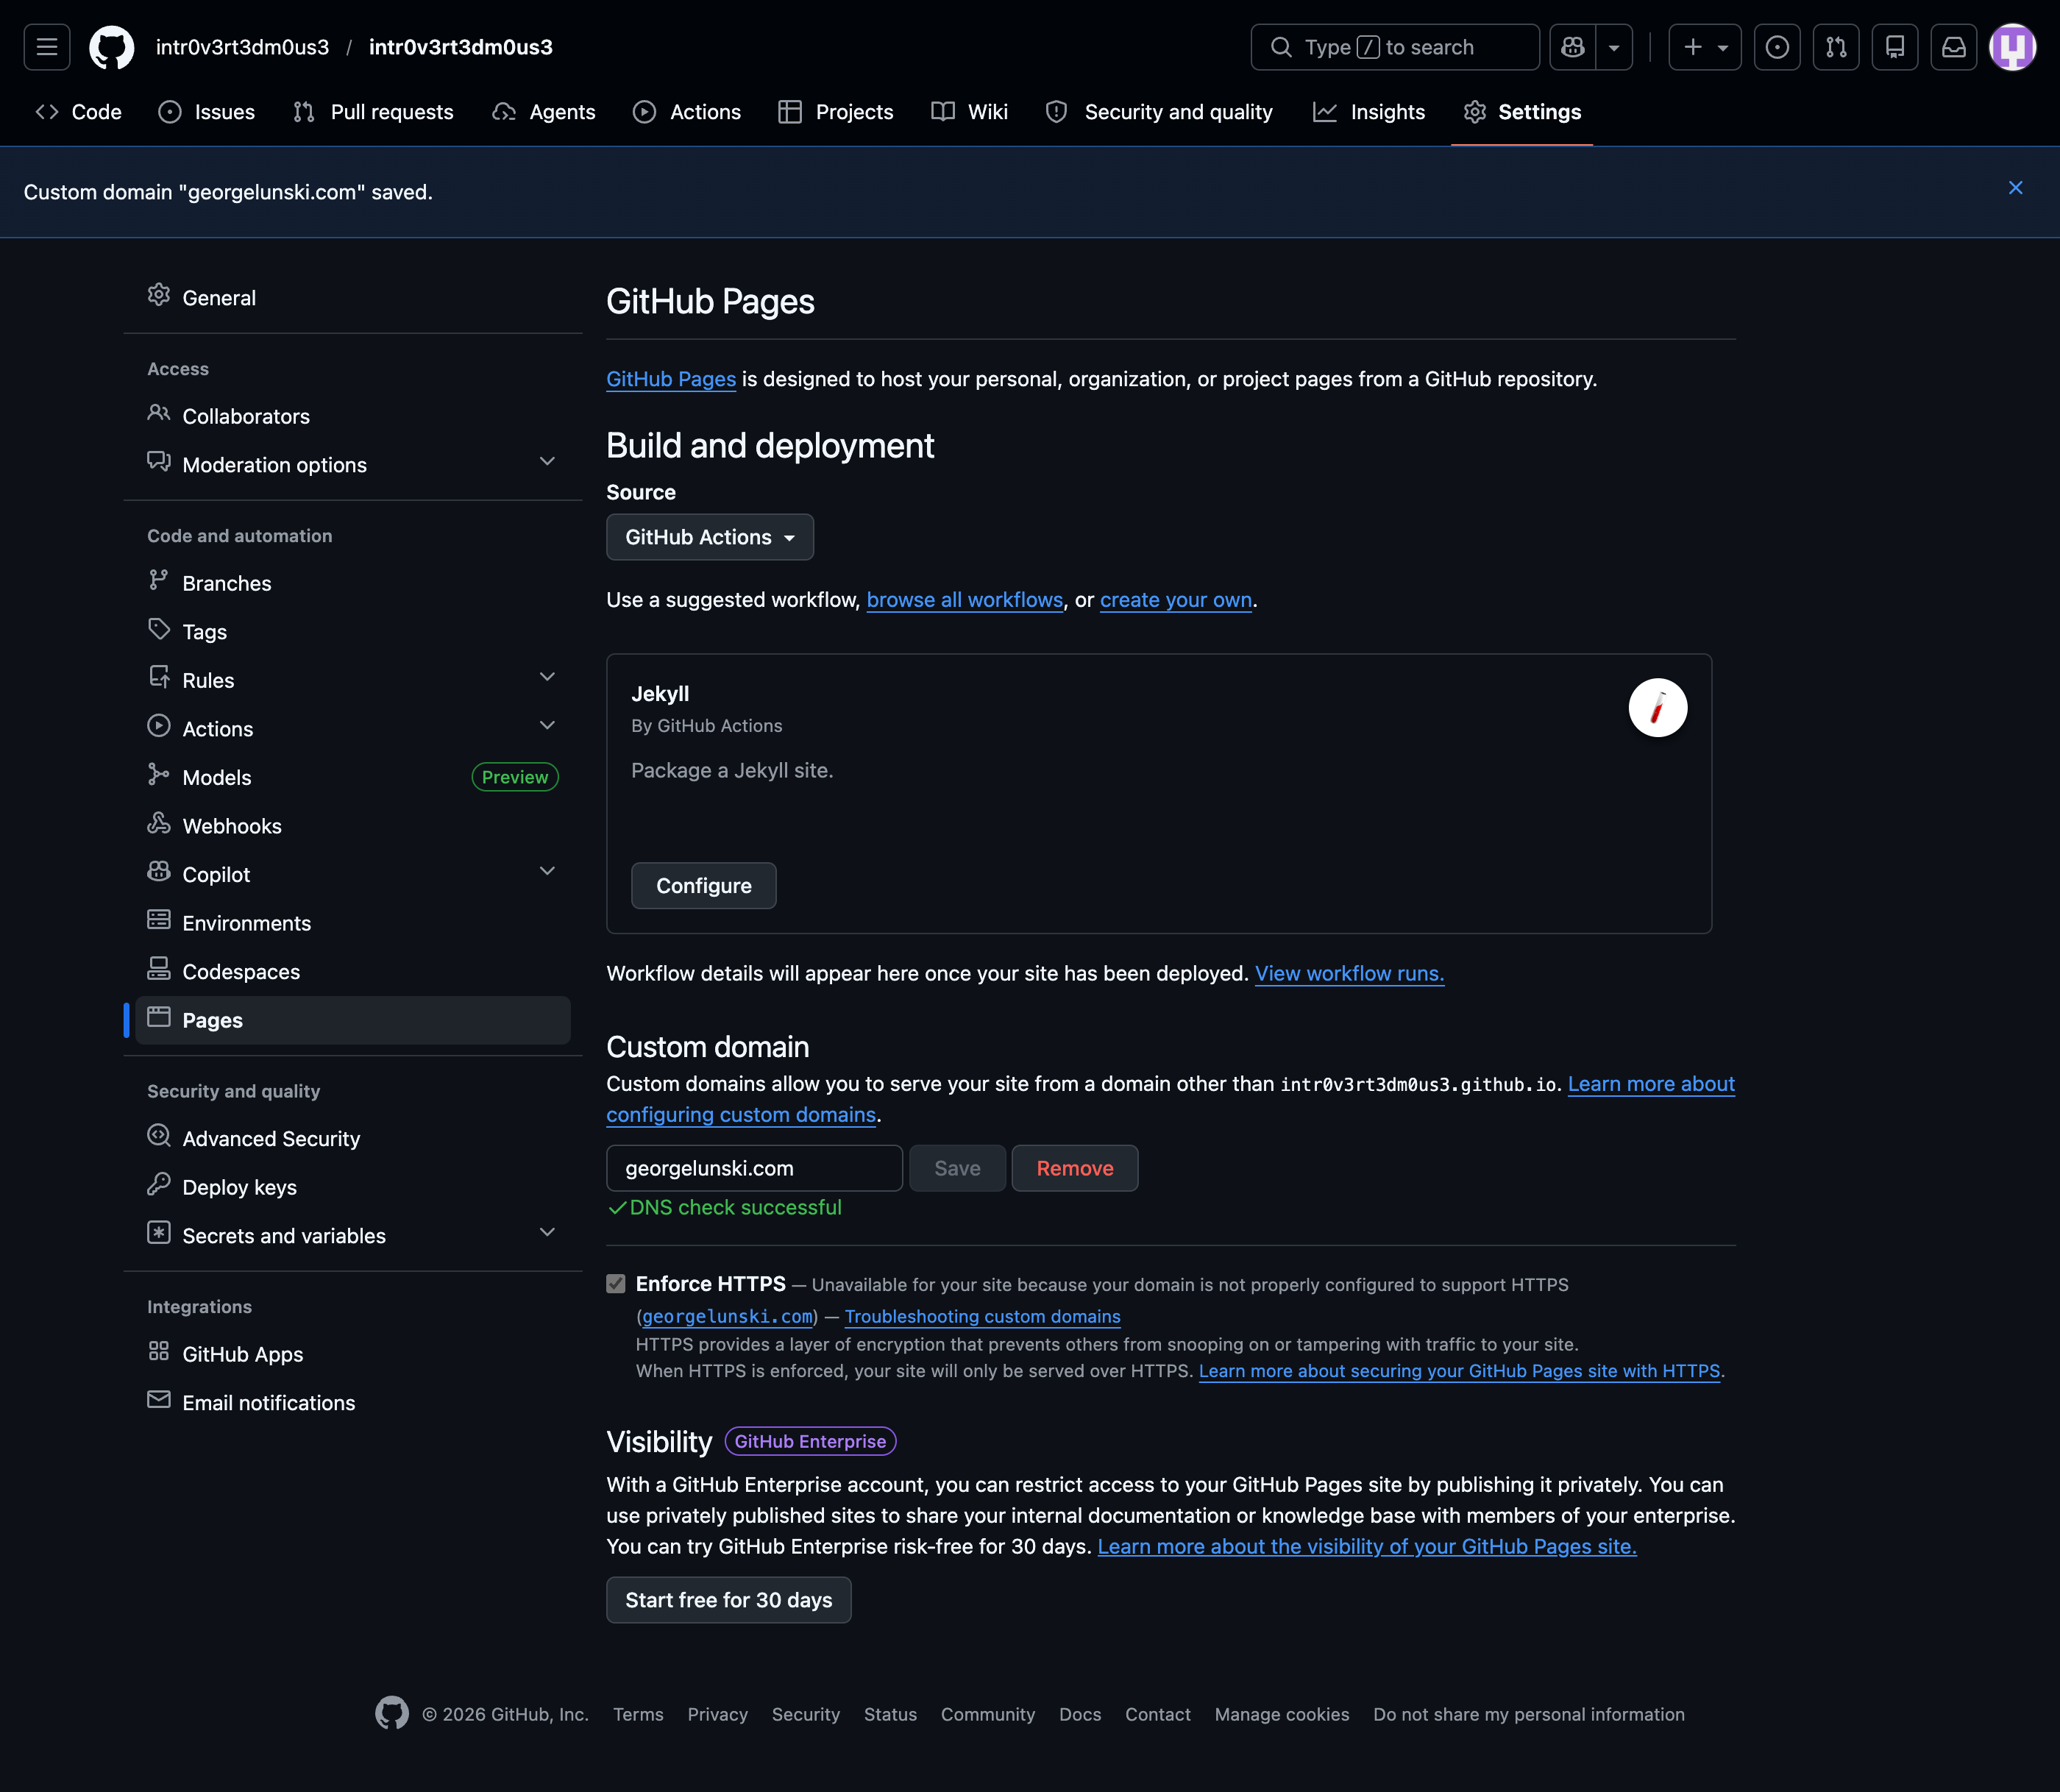
Step 3: Wire up a custom domain
This is the part where people usually get stuck. Take it one substep at a time.
3a. Tell GitHub about the domain
- Settings → Pages → Custom domain.
- Type your domain — apex (
georgelunski.com) orwww(www.georgelunski.com). I’ll use the apex. - Click Save.
GitHub does two things here. If you were deploying from a branch, it would commit a CNAME file into your repo root. Since we’re deploying via Actions, no CNAME file is created, and it wouldn’t be needed if one existed. GitHub also immediately starts a DNS check, which will stay in “DNS Check in Progress” until your DNS actually points here.
Pages-04-18-2026_05_44_AM.png) Domain
Domain
3b. Configure DNS in Cloudflare
Head over to your Cloudflare dashboard → your domain → DNS → Records. You need five records total: four A records for the apex and one CNAME for www.
Add these four A records for the apex (@):
1
2
3
4
5
Type  Name  Content
A     @     185.199.108.153
A     @     185.199.109.153
A     @     185.199.110.153
A     @     185.199.111.153
Then add a CNAME so www redirects to your apex:
1
2
Type   Name  Target
CNAME  www   <username>.github.io
Those four IPs are GitHub’s anycast Pages edge — still current as of 2026. If you prefer IPv6, GitHub also publishes four AAAA records (2606:50c0:8000::153 through ::8003::153), but the A records alone are enough.
Account-home-Cloudflareaccount3-georgelunski-com-s-Account-Cloudflare-04-18-2026_01_25_PM.png) Cloudflare
Cloudflare
3c. The Cloudflare proxy decision (orange vs grey cloud)
This is the single most misunderstood thing about putting a Cloudflare-proxied domain in front of GitHub Pages. Here’s the mechanic: when the orange cloud is on, public DNS returns Cloudflare’s IPs, not GitHub’s. GitHub’s Let’s Encrypt provisioning checks that your domain points at GitHub before issuing a cert. If it sees Cloudflare’s IPs, it refuses, and your Enforce HTTPS checkbox stays greyed out.
The clean path:
- Start DNS-only (grey cloud) on the five records.
- Wait for GitHub’s “DNS Check Successful” and for the Let’s Encrypt cert to issue. This is usually under an hour but can take up to 24 hours.
- Check the Enforce HTTPS box in GitHub Pages settings.
- Then flip the A records back to Proxied (orange cloud) if you want Cloudflare’s CDN, analytics, or WAF.
Once you proxy, set SSL/TLS → Overview → Encryption mode in Cloudflare to Full (Strict). This validates the origin certificate end-to-end. If you’re worried about GitHub’s ~90-day renewal failing while proxied (a known issue), Full (non-strict) is a more forgiving fallback. Full (Strict) is generally the right answer for a fresh setup.
Never use “Flexible.” Cloudflare → GitHub Pages on HTTP while Pages redirects every request to HTTPS produces an ERR_TOO_MANY_REDIRECTS loop. It’s also insecure.
GitHub’s Let’s Encrypt cert renews roughly every 60–90 days. If Cloudflare is proxying when renewal runs, it can silently fail and your visitors will eventually see TLS errors. If that happens, briefly flip the cloud grey, let the cert renew, then flip it back. Some folks just let Cloudflare handle TLS entirely and stop relying on GitHub’s Enforce HTTPS.
Back in GitHub Pages settings, wait for the status to flip to DNS Check Successful. Tick Enforce HTTPS. Load https://yourdomain.com — you should see your Chirpy site.
Step 4: Run Chirpy locally (optional but worth it)
Editing directly on GitHub works, but previewing locally is far nicer. You’ll need Ruby 3.1 or newer (Chirpy’s gemspec pins ~> 3.1; Jekyll 4.3 is the runtime). On macOS, brew install ruby chruby ruby-install and add Ruby’s bin to your PATH. On Linux, use your package manager or rbenv. On Windows, the easiest path is the .devcontainer/ folder that ships with the starter — open the repo in VS Code, install the Dev Containers extension, and click “Reopen in Container.”
1
2
3
4
git clone https://github.com/<username>/<username>.github.io.git
cd <username>.github.io
bundle install
bundle exec jekyll serve
Your site is now at http://127.0.0.1:4000. Edits trigger a rebuild within seconds.
If your local machine isn’t Linux, run
bundle lock --add-platform x86_64-linuxonce before pushing, so CI can resolve gems for the Ubuntu runner.
Step 5: Edit _config.yml — the one file that matters most
Open _config.yml at the repo root. The defaults work, but the personal fields are empty. The essentials:
1
2
3
4
5
6
7
8
9
10
11
12
13
14
15
16
17
18
19
20
21
url: "https://georgelunski.com"
title: George Lunski
tagline: Notes on code, systems, and the occasional detour.
description: >-
  A personal blog about software engineering, self-hosting,
  and whatever I'm currently taking apart.

github:
  username: georgelunski

social:
  name: George Lunski
  email: hello@georgelunski.com
  links:
    - https://github.com/georgelunski
    - https://x.com/georgelunski

avatar: /assets/img/avatar.png
timezone: America/Chicago
lang: en
theme_mode:          # "light", "dark", or leave empty for auto
Drop your avatar into assets/img/avatar.png to match the path above. Social contacts that appear in the sidebar (GitHub, email, RSS, etc.) are defined in _data/contact.yml.
Optional sections further down handle analytics (Google Analytics, GoatCounter, Umami, Cloudflare Web Analytics), comments (Disqus, Giscus, Utterances), and CDN origins (_data/origin/cors.yml). Enable only the provider you use by setting its id — leave the rest blank.
Step 6: Write your first post
Posts live in _posts/ and must be named YYYY-MM-DD-slug.md. Create _posts/2026-04-18-hello-world.md:
1
2
3
4
5
6
7
8
9
10
11
12
---
title: Hello, world
date: 2026-04-18 10:00:00 -0500
categories: [Blogging, Meta]
tags: [chirpy, jekyll]
---
This is my first post on Chirpy. The theme does most of the work —
I just write Markdown.

_My desk, approximately._
A few Chirpy-specific touches you’ll use often: set pin: true to stick a post to the top of the home page, add image: /assets/img/feature.jpg (or the object form with path and alt) for a featured image, set math: true to enable MathJax, and mermaid: true to turn ```mermaid fences into diagrams. categories accepts at most two entries (top, sub); tags has no limit and should be lowercase.
Images go in /assets/img/ (or a subfolder) and are referenced with a root-relative path. For callouts, use a blockquote followed by a class attribute — {: .prompt-tip }, {: .prompt-info }, {: .prompt-warning }, or {: .prompt-danger }.
Step 7: Ship it
1
2
3
git add _posts/2026-04-18-hello-world.md
git commit -m "First post"
git push
The pages-deploy.yml workflow runs automatically. Roughly a minute later your post is live.
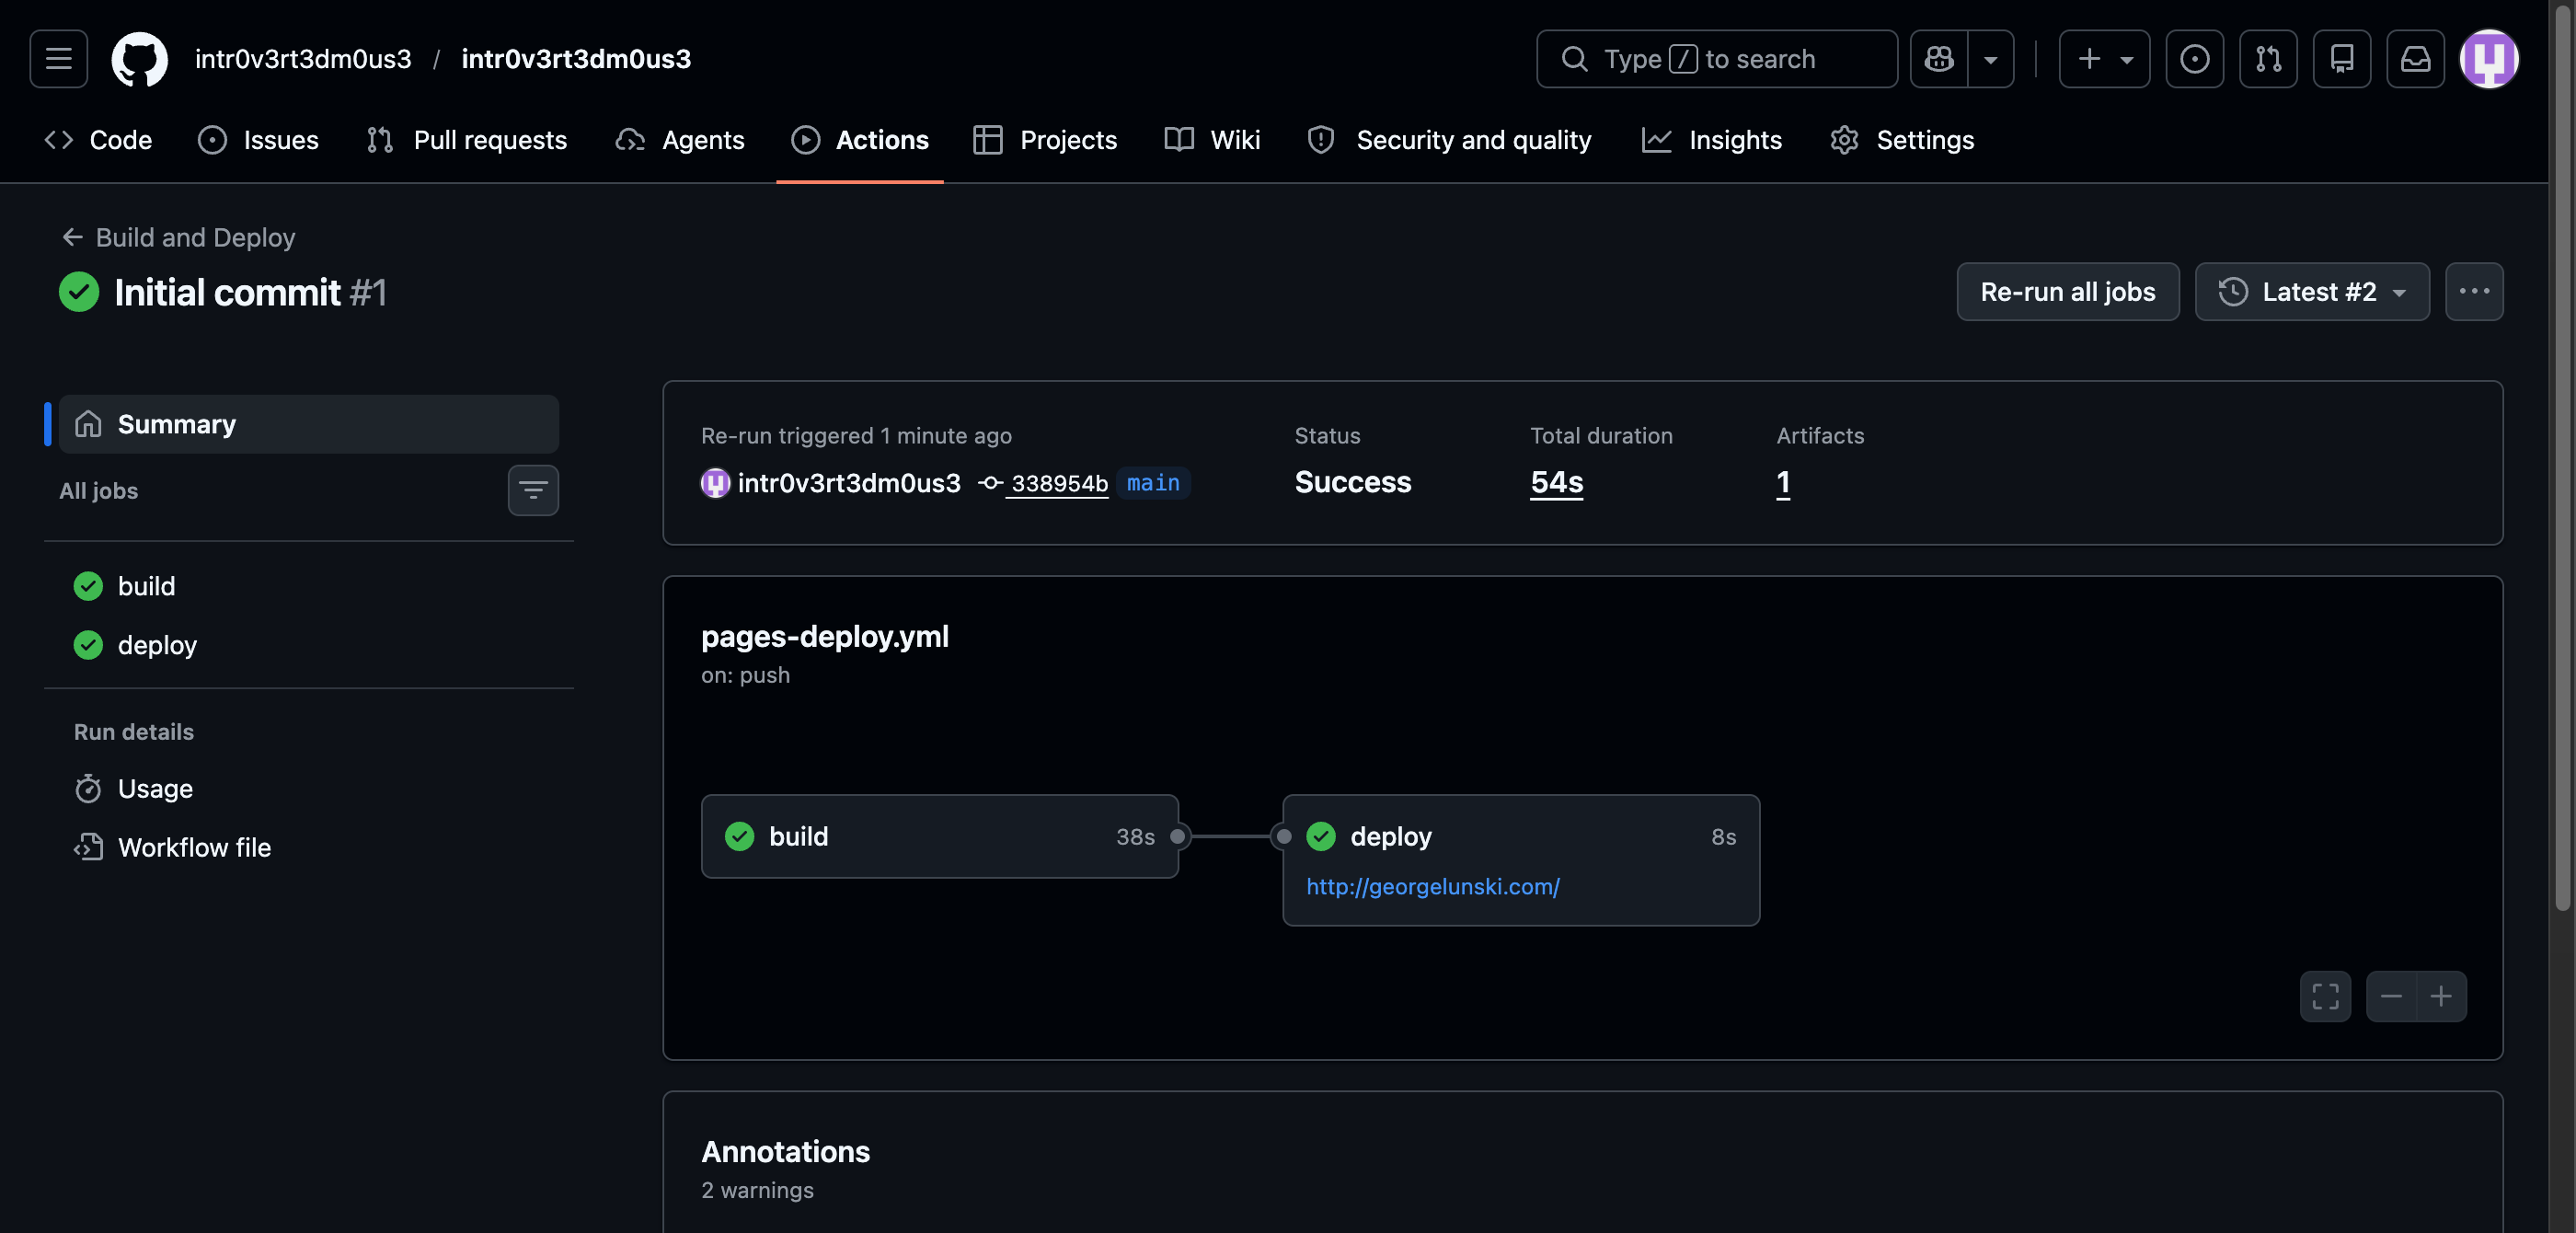 Deploy
When things go sideways
Build fails. Open the Actions tab and read the log — it’s almost always a YAML error in your front matter. Missing --- delimiters, bad indentation, or a date without a timezone offset are the usual culprits.
Images 404 in production but work locally. Check capitalization (GitHub’s runners are case-sensitive, macOS is not) and that your path starts with /assets/.
“Enforce HTTPS” is greyed out forever. Cloudflare proxy is almost certainly the cause. Flip the records to DNS-only, wait an hour, try again. Also confirm you don’t have a CAA record blocking Let’s Encrypt.
Redirect loop on the custom domain. Cloudflare SSL/TLS mode is “Flexible.” Change it to Full (Strict).
Upgrading Chirpy. Because chirpy-starter is a template, not a fork, git pull upstream main won’t work. The cleanest paths are either (a) watch the Chirpy releases page and manually copy changed files from the latest starter into your repo, or (b) switch to the jekyll-theme-chirpy gem workflow — edit your Gemfile to depend on the gem and restructure your repo accordingly. The gem route makes updates a bundle update jekyll-theme-chirpy away, at the cost of a slightly more involved one-time migration.
After upgrading past v7.4.0, refresh your favicons using Chirpy’s favicon tutorial — the asset set changed.
Wrapping up
You now have a Chirpy site on your own domain, end-to-end encrypted, deploying on every push. The heavy lifts — theming, SEO, search, responsiveness — are already done. Your only remaining job is the fun one: write.
A few next steps when you’re ready: set up Giscus so readers can comment via GitHub Discussions, enable GoatCounter for privacy-friendly analytics, and poke through _tabs/ to add an About page. The official Chirpy docs cover the rest.
Welcome to the blog-having life.
References
- Chirpy getting started — https://chirpy.cotes.page/posts/getting-started/
- Chirpy writing guide — https://chirpy.cotes.page/posts/write-a-new-post/
- Chirpy theme repo — https://github.com/cotes2020/jekyll-theme-chirpy
- Chirpy starter template — https://github.com/cotes2020/chirpy-starter
- GitHub Pages custom domains — https://docs.github.com/en/pages/configuring-a-custom-domain-for-your-github-pages-site/managing-a-custom-domain-for-your-github-pages-site
- GitHub Pages troubleshooting — https://docs.github.com/en/pages/configuring-a-custom-domain-for-your-github-pages-site/troubleshooting-custom-domains-and-github-pages
- Cloudflare SSL/TLS modes — https://developers.cloudflare.com/ssl/origin-configuration/ssl-modes/
- Jekyll installation — https://jekyllrb.com/docs/installation/
Notes
A quick note
This blog is a hobby project, and I’m not an expert on the topics I write about — just someone who enjoys learning in public and sharing what I find along the way. That means I’ll sometimes get things wrong, oversimplify, or miss nuance, and I’d genuinely love to hear about it.
If you have thoughts, corrections, questions, or just want to chat about this post, please join the conversation over on GitHub Discussions.
All friendly perspectives are welcome — I’m here to learn.
Last updated: [Wednesday, 22nd April 2026].